


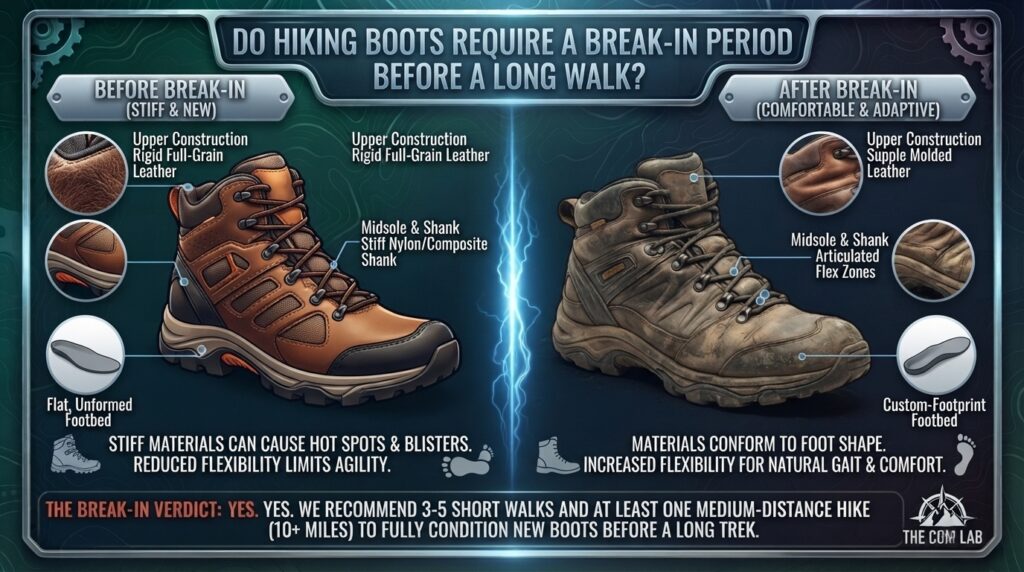
You are standing in an outdoor retail shop, eyeing a pristine pair of premium leather hiking boots. They feel sturdy, armor-plated, and ready to conquer the world. You have a massive long-distance trek planned in two weeks—perhaps a stunning loop through California’s High Sierra, a wet mountain push in Washington, or a rugged desert trek across the rocky canyons of Texas.
You ask the salesperson if they are ready to go out of the box. They smile and give you a classic piece of backcountry advice: “Make sure you break them in first, or your feet will pay the price.”
But in an era dominated by advanced synthetic materials, lightweight textiles, and out-of-the-box comfort tech, does this old-school rule still hold true? Do hiking boots genuinely require a break-in period before a long walk?
The definitive answer is: It depends entirely on the construction materials of the boot. Heavy-duty leather boots absolutely require an intentional 20 to 50-mile break-in period to avoid severe injury and blistering. Conversely, modern synthetic or hybrid mid-boots require almost zero break-in time, needing only a single casual walk to settle the structural seams.
For digital creators and adventurers framing their next itinerary on myecoadventure.com, understanding this distinction is crucial. This deep-dive guide explores the material science, biomechanics, and field-tested strategies behind breaking in hiking footwear safely, protecting your feet across America’s most demanding regional landscapes.
1. The Science of the “Break-In”: Why Materials Dictate the Rules
To understand why a boot needs a break-in period, we have to look closely at material science and human anatomy. Your foot is a highly dynamic structure composed of 26 bones, 33 joints, and more than 100 muscles, tendons, and ligaments. When you walk, your foot expands, flexes, flattens, and twists.
A hiking boot is designed to limit some of this movement to protect you from rolling ankles or bruising your soles on jagged rocks. The tension between your moving foot and a rigid shoe creates friction. The goal of breaking in a boot is to permanently deform the boot’s materials at specific flexion zones so it mirrors the unique anatomy of your foot.
[Stiff New Boot Fabric] + [Foot Movement] = Friction & Blisters
                  │
          (Break-In Process)
                  ▼
[Molded Flexion Zones]  + [Foot Movement] = Fluid, Pain-Free Strides
Traditional Full-Grain Leather: The Unyielding Armor
Full-grain leather is made from the outer hide of an animal, valued for its incredible thickness, water resistance, and longevity.
- The Structure: On a microscopic level, leather consists of densely interwoven collagen fiber bundles. When brand new, these fibers are tightly packed and highly rigid.
- The Transformation: Breaking in a leather boot requires heat, moisture (from your foot sweat), and mechanical pressure to stretch, loosen, and permanently flex these fibers. Until this happens, the rigid leather will act like a vise, pressing relentlessly against your heel bone, instep, and pinky toes.
Modern Synthetics: The Ready-to-Wear Alternative
Modern boots utilize advanced materials like nylon mesh, split-grain suede, TPU (thermoplastic polyurethane) overlays, and synthetic leather alternatives.
- The Structure: These materials are engineered to be highly flexible from day one. They do not possess a dense matrix of natural fibers that need to stretch; instead, they feature woven structures that flex instantly under minimal load.
- The Transformation: While synthetic boots don’t need to stretch, they do require a brief “settling” period. This allows the internal foam cushioning to compress around the shape of your heel and permits the structural stitching to relax slightly.
2. The Physical Dangers of Skipping the Break-In
Attempting to log a 15-to-20-mile hike in an un-broken-in, rigid boot is one of the fastest ways to end up off the trail or in a medical tent. The physical toll goes far beyond standard skin irritation.
Deep Structural Blisters
When a rigid boot heel cup fails to flex as your foot lifts off the ground, your heel slides up and down against the stiff interior lining. This repetitive friction shears the outer layers of your skin away from the deeper dermal layers. Fluid fills the gap, creating a blister. Over long distances, these can turn into deep, bleeding structural wounds that make walking impossible.
Subungual Hematoma (“Runner’s Toe”)
If the leather across the forefoot of a new boot has not yet softened and stretched, it will compress your toes downward and backward with every downhill step. This repetitive impact causes blood to pool under the toenail (a subungual hematoma), eventually causing the toenail to die and fall off entirely.
Tendonitis and Extensor Strain
Because an unbroken boot sole does not flex easily at the ball of the foot, your lower leg muscles (particularly the tibialis anterior and your calf muscles) must work twice as hard to lift and pull the shoe forward. This unnatural strain can quickly manifest as acute shin splints or extensor tendonitis along the top of your foot.
3. Geographic Breakdown: Matching the Boot to Your Region’s Terrain
Depending on where your audience on myecoadventure.com is hiking, the choice of boot material—and the importance of the break-in period—will vary significantly based on regional geography.
Washington: The Wet, Technical Wilderness Test
The Pacific Northwest—including the Cascade Mountains, Mount Rainier, and the Olympic Peninsula—presents a punishing combination of steep elevation gains, mud, wet river crossings, and slippery tree roots.
- The Footwear Choice: Hikers here overwhelmingly favor durable, waterproof leather boots or heavy-duty synthetic hybrids capable of sealing out constant moisture and resisting abrasions from wet granite.
- The Break-In Mandate: CRITICAL. If you attempt to tackle a steep, slick Washington trail with an unbroken leather boot, your foot will slide internally on off-camber slopes, causing catastrophic friction. The leather must be thoroughly softened and treated with water-proofing conditioners before setting foot in the rain forest.
California: The Granite Miles of the High Sierra
California hiking ranges from the loose, dry soil of Southern California to the unrelenting granite steps of the John Muir Trail and Yosemite National Park.
- The Footwear Choice: Due to the dry heat and hard-packed rocky paths, lightweight synthetic mid-boots or trail running shoes dominate the landscape.
- The Break-In Mandate: MODERATE TO LOW. If you choose a modern synthetic mid-boot for California’s dry trails, a brief 2-to-3-day adjustment period is all that is required. The priority here is ensuring the internal foam molds to your foot to prevent “toe bang” on long, steep granite descents.
Texas: Sun-Baked Rock and Thorn Defense
Hiking in Texas (from Big Bend National Park to the rugged canyons of Palo Duro) involves dealing with loose limestone scree, volcanic rock, radiant trail heat, and sharp cacti.
- The Footwear Choice: Hikers need a tough exterior to deflect sharp rocks and thorny vegetation, making durable nubuck leather or heavy-duty synthetic mesh ideal.
- The Break-In Mandate: HIGH. The intense Texas heat accelerates foot swelling. If your boot’s upper has not been broken in to allow for natural foot expansion, the rigid material will restrict blood flow, resulting in an incredibly painful burning sensation on the bottom of your feet.
New York & San Francisco: Urban-to-Backcountry Transitions
For city-dwellers in New York (escaping to the rocky paths of the Hudson Highlands or Catskills) or San Francisco (heading out to the steep hills of the Marin Headlands or Mount Tamalpais), boots face mixed usage.
- The Footwear Choice: Versatile, hybrid synthetic hiking boots that blend urban styling with trail-ready outsoles.
- The Break-In Mandate: LOW. These lifestyle-hybrid boots are designed for multi-surface comfort out of the box. However, walking on concrete sidewalks in a brand-new boot to get to the trailhead can reveal hidden friction points early, making it an excellent way to safely complete a quick break-in.
4. Comprehensive Footwear Material Comparison Matrix
To identify exactly how long your break-in process will take, look at how different boot materials stack up across performance and preparation metrics.
| Boot Material Type | Typical Examples | Break-In Time Required | Expected Lifespan | Ideal Terrain |
| Full-Grain Leather | Heavy Backpacking & Mountaineering Boots | 40 to 60 Miles (Mandatory progression) | 800 – 1,500 Miles (Can be resoled) | Off-trail, heavy loads, snow, jagged rock |
| Nubuck / Suede Leather | Mid-Weight Backpacking & Day Hiking Boots | 15 to 30 Miles (Moderate softening needed) | 500 – 800 Miles | General rugged trails, rocky paths |
| Synthetic Nylon / Mesh | Lightweight Day Hikers & Hybrid Boots | 1 to 5 Miles (Essentially out-of-the-box) | 300 – 500 Miles | Maintained trails, hot climates, fastpacking |
| Leather/Synthetic Blend | Modern Technical Mountain Boots | 10 to 20 Miles (Stiff sole, flexible upper) | 400 – 700 Miles | Mixed alpine terrain, wet and variable climates |
5. The Step-by-Step Guide to Safely Breaking In Your Boots
If you have purchased a boot that requires an intentional break-in period, do not rush the process. Follow this field-tested, step-by-step sequence to mold the boot to your feet perfectly without causing injury.
1.The Living Room Test:1 to 2 Hours.
Wear your new boots inside your house with the exact socks and insoles you plan to use on the trail. Sit at your desk, walk up and down the stairs, and stand on your toes. If you notice an immediate, painful pressure point, the boot may be the wrong size or shape for your foot structure, allowing you to return them clean.
2.The Neighborhood Walk:1 to 3 Miles.
Take the boots outside for short walks on flat, paved surfaces around your neighborhood. This introduces gentle repetitive flexion to the sole plate and begins the process of softening the leather around your ankles and midfoot.
3.The Weighted Urban Stroll:3 to 5 Miles.
Put on the backpack you intend to use and fill it with roughly 10 to 15 lbs of gear. Walk on a mix of pavement, grass, and local park paths. Adding weight changes how your foot settles into the footbed and forces the boot’s midsole foam to compress around your unique footprint.
4.The Short Trail Shakedown:4 to 8 Miles.
Hit a local, well-maintained dirt trail with variable elevation. This introduces multi-directional lateral stress to the boot, testing the ankle cuffs and forcing the leather across the top of your toes to crease and soften permanently. If you complete this step blister-free, your boots are officially ready for a long-distance walk.
6. Pro Tips for Flawless Boot Adaptation
To guarantee a successful transition from new gear to trusted trail companion, implement these advanced footwear adaptation strategies:
- Use Boot Conditioner on Leather: If you are breaking in a stiff, full-grain leather boot, apply a specialized leather conditioner (like Nikwax or Sno-Seal) before your first walk. The conditioner penetrates the leather pores, softening the structural collagen fibers and allowing them to stretch and adapt to your foot significantly faster.
- Never Use the “Water Soaking” Myth: An old, dangerous piece of military lore suggests soaking your new leather boots in a bathtub of warm water and walking in them until they dry. Do not do this. This forces the leather to over-stretch, strips away natural oils, weakens structural glue, and can cause the leather to shrink and crack as it dries, completely ruining an expensive pair of boots.
- Pre-Tape Your Hotspots: During the break-in process, pay close attention to your feet. The moment you feel a slight warming sensation (a hotspot) on your heel or toes, stop immediately. Apply a strip of premium medical tape, KT tape, or Leukotape directly over the skin. This creates an external sacrificial barrier, forcing the boot to rub against the tape rather than tearing your skin.
7. 10 Comprehensive Frequently Asked Questions (FAQs)
1. How can I tell if a boot is too small during the break-in period?
Unlace the boot completely and slide your foot forward until your toes touch the very front wall. Slide your index finger down behind your heel. If you cannot easily fit your finger behind your heel, the boot is too small. When standing normally and fully laced, your toes should never touch the front wall of the boot, especially when walking down an incline.
2. Can I use a shoe stretcher to speed up the break-in process of a hiking boot?
Yes, but only for width and only on leather boots. A mechanical shoe stretcher can help widen a tight toe box or stretch an instep area overnight. However, a stretcher cannot alter the length of a boot, nor can it replicate the dynamic multi-directional flexion that occurs at the ankle and sole when walking on a real trail.
3. Why do my new hiking boots feel fine at first but hurt after two miles?
This occurs because your feet naturally expand and swell as blood flow increases and your arches flatten under the repetitive impact of walking. A boot that feels perfectly snug in a showroom or during the first ten minutes of a walk can become an agonizing constriction chamber once your feet expand to their full trail volume.
4. Do synthetic hiking boots stretch at all over time?
Synthetic materials (like nylon, polyester, and TPU) have excellent elastic memory, meaning they resist permanent stretching. While a synthetic boot will not widen or stretch like leather, it will loosen up slightly as the internal foam padding compresses and conforms to the shape of your heel and ankles over the first 5 to 10 miles.
5. Should I break in my hiking boots with the factory insoles?
Only if you plan to hike on them. Most factory insoles are flat, inexpensive pieces of generic foam. If you plan to use structured aftermarket orthotics or specialized arch supports (such as Superfeet or custom podiatric molds), you must install them on day one of the break-in process. Changing insoles later alters your foot’s position inside the boot, resetting the break-in process.
6. What should I do if my heel slips up and down inside my new boot?
A minor amount of heel lift (less than a quarter of an inch) is normal in a stiff, brand-new leather boot because the sole plate refuses to flex yet. However, if it slips significantly, it will cause a blister. Try utilizing a heel-lock lacing technique (using the upper speed hooks to create a pulley system that pulls your heel back into the pocket) or switch to a thicker merino wool sock to fill the excess volume.
7. Is it normal for my ankles to feel sore after walking in new hiking boots?
Yes, mild soreness around the ankle bones is common when breaking in mid-to-high-top boots. The upper collar of a new boot is stiff and can press uncomfortably against the ankle bones (malleoli). As you log miles, this upper cuff will soften, bend, and lose its rigid edge.
8. How long do leather hiking boots last once they are fully broken in?
A premium, well-maintained pair of full-grain leather boots can easily last between 800 to 1,500 miles. Because their uppers are exceptionally durable, high-end leather boots are often designed to be resoled by a professional cobbler once the rubber tread wears flat, allowing you to keep the perfectly molded leather upper for a decade or more.
9. Can I break in my hiking boots by wearing them to my office job?
While wearing them around an office or retail workplace is a safe way to start the initial “Living Room Test” and check for major fit issues, it is not sufficient for a complete break-in. Walking on perfectly flat indoor floors does not subject the boot to the dynamic, uneven, lateral angles and loaded pack weight that it will face on an actual wilderness trail.
10. Does Gore-Tex affect the break-in time of a hiking boot?
A waterproof Gore-Tex liner does not significantly alter the mechanical break-in time of the outer leather or fabric. However, because waterproof linings restrict airflow, they trap more body heat and foot sweat inside the boot. This extra moisture can soften your skin faster, making you more susceptible to blisters during the initial miles of the break-in period if you aren’t wearing high-quality moisture-wicking wool socks.
Conclusion: Value Your Footwear Foundation
When building out your gear lists and trip advice on myecoadventure.com, remember that patience is a critical safety tool in the backcountry. Your footwear is the foundation of your entire kinetic chain. Treating it as a plug-and-play accessory can lead to painful trail failures.
If you opt for a modern, lightweight synthetic hiking boot for an upcoming trip to California or San Francisco, you can rest easy knowing that a few casual walks will have them fully prepared for high mileage.
But if your destination demands the heavy-duty, unyielding protection of traditional full-grain leather—especially for the wet, rocky, and unpredictable terrains of Washington or Texas—respect the material science. Dedicate the necessary weeks to systematically break them in before your trip. Your feet will thank you with every pain-free mile, turning a potentially agonizing trek into a seamless wilderness adventure.


