


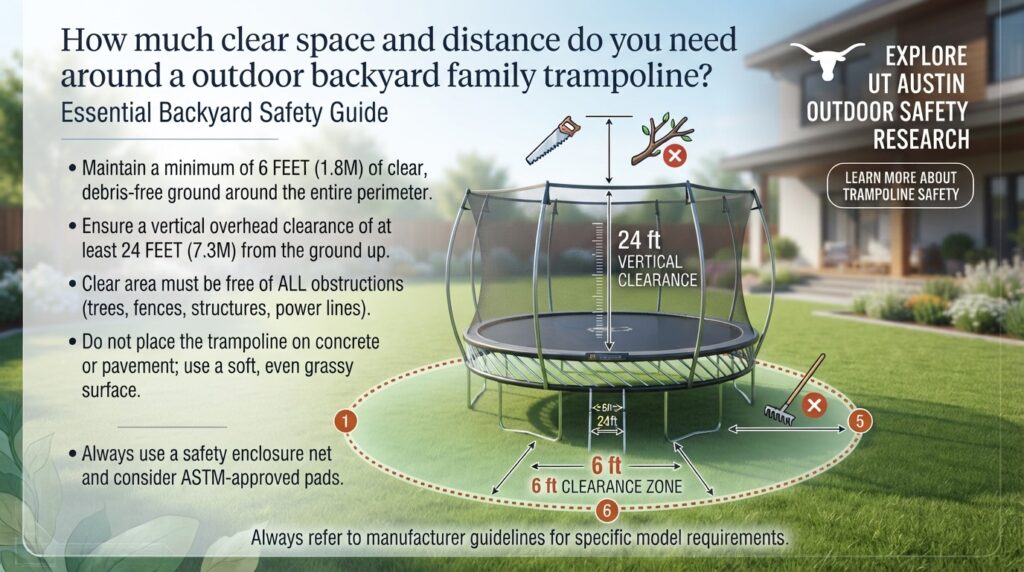
How much clear space and distance do you need around a outdoor backyard family trampoline? Installing an outdoor family trampoline is one of the most exciting additions you can make to a backyard. It turns open outdoor space into a hub for exercise, outdoor play, and family fun. However, improper placement remains one of the most common mistakes homeowners make during setup.
A clear, unobstructed buffer zone around and above your trampoline is critical for safety and long-term durability. Skipping safety clearances or placing a trampoline too close to fences, rooflines, trees, or hard landscaping creates severe collision hazards and increases the risk of fall injuries.
Whether you are fitting a trampoline into a compact suburban yard in San Francisco, a sprawling lawn in Texas, a shaded retreat in Washington, or a private courtyard in New York or California, this comprehensive guide outlines the exact space, height, and surface requirements needed to create a safe setup.
1. Quick Reference: Minimum Clearance Dimensions
Before unboxing or digging, use these baseline clearance standards to measure your setup area.
| Dimension | Minimum Standard | Ideal Safety Distance | Key Hazard to Prevent |
| Lateral Clear Space (Sides) | 6 feet (1.8 meters) | 8–10 feet (2.4–3 meters) | Fences, walls, retaining walls, trees, outdoor furniture |
| Vertical Clearance (Overhead) | 18 feet (5.5 meters) | 20–24 feet (6.1–7.3 meters) | Tree branches, power lines, patio roofs, pergolas |
| Underneath Clearance | 3–4 feet (0.9–1.2 meters) | 4 feet (1.2 meters) | Rocks, garden tools, sprinkler heads, root systems |
| Door/Access Clearance | 6 feet (1.8 meters) | 8 feet (2.4 meters) | Trip hazards at the zipper/ladder entrance |
| Distance Between Trampolines | 8 feet (2.4 meters) | 10 feet (3 meters) | Collision between rebounding jumpers |
Pro-Tip: Always measure safety clearance from the outer edge of the frame/enclosure net, not from the bouncing mat. Enclosure poles and safety netting flex outward during an impact, taking up extra clearance space beyond the steel frame.
2. Lateral Space: The 6-to-8 Foot Clearance Rule
The lateral buffer zone refers to the open perimeter surrounding all sides of your trampoline.
┌─────────────────────────────────────────────────────────────┐
│                 SAFE LATERAL CLEARANCE ZONE                 │
├─────────────────────────────────────────────────────────────┤
│                                                             │
│       FENCE / WALL / TREE                                   │
│            │                                                │
│            ▼                                                │
│      [ 6–8 FT BUFFER ] ◄── Open space, soft turf            │
│            │                                                │
│            ▼                                                │
│     ┌───────────────┐                                       │
│     │ ENCLOSURE NET │ ◄── Net flexes up to 2 ft on impact   │
│     │ ┌───────────┐ │                                       │
│     │ │ BOUNCE MAT│ │                                       │
│     │ └───────────┘ │                                       │
│     └───────────────┘                                       │
│                                                             │
└─────────────────────────────────────────────────────────────┘
Safety organizations, including the ASTM International (F381-16 standard) and the American Academy of Pediatrics (AAP), recommend a minimum of 6 feet of lateral clear space around the entire frame. However, maintaining 8 to 10 feet provides an even safer layout.
Why Safety Nets Are Not Enough
A safety enclosure net is a vital containment feature, but it is not a solid wall. When a jumper impacts the net at high speed, the netting and flexible support poles bow outward up to 1.5 to 2 feet. If a fence line, brick wall, or wooden post sits just 2 feet away, the jumper can hit the rigid barrier through the flexed net.
Ground Objects to Clear
The 6-to-8 foot safety zone must be completely free of:
- Wooden, chain-link, or vinyl property fences
- Retaining walls, brick facades, and concrete patio borders
- Tree trunks, roots, and decorative garden boulders
- Metal patio furniture, grills, and fire pits
- Play structures, swing sets, and sheds
3. Overhead Clearance: Maintaining Vertical Headroom
Vertical clearance is often overlooked when setting up under mature shade trees or patio structures. Jumpers can easily reach heights of 6 to 10 feet above the mat, placing their heads 12 to 16 feet off the ground.
       POWER LINES / HIGH BRANCHES
                    ▲
                    │  Must maintain 18–24 FT total headroom
                    ▼
          [ MAXIMUM BOUNCE APEX ]
                    ▲
                    │  Jumper height + vertical rebound
                    ▼
          ┌───────────────────┐
          │   TRAMPOLINE MAT  │  (3 ft off ground)
          └───────────────────┘
The 18-Foot Overhead Standard
Maintain a minimum of 18 feet (5.5 meters) of unhindered vertical clearance measured from the ground up. In yards with energetic teens or gymnasts, aim for 20 to 24 feet.
Common Overhead Hazards
- Low Tree Branches: Branches sway in the wind and sag under snow or rain, creating scraping hazards or limb breakage risks.
- Utility & Power Lines: Never place a trampoline beneath overhead electric, cable, or telephone lines. In severe weather, falling lines create life-threatening electrical hazards.
- Overhangs & Rooflines: Patio covers, pergolas, eaves, and gazebo roofs can cause severe head and spinal injuries if hit during a high bounce.
4. Ground Preparation and Under-Trampoline Hazards
What lies beneath your trampoline frame is just as important as what surrounds it.
┌─────────────────────────────────────────────────────────────┐
│                 UNDER-TRAMPOLINE IMPACT ZONE                │
├─────────────────────────────────────────────────────────────┤
│                                                             │
│     ┌───────────────────────────────┐                       │
│     │   BOUNCING MAT UNDER LOAD     │                       │
│     └───────────────┬───────────────┘                       │
│                     │                                       │
│                     ▼ Max mat depression under heavy load   │
│             [ 2–3 FT CLEARANCE ]                            │
│                     │                                       │
│                     ▼                                       │
│   ═════════════════════════════════════════  GROUND LEVEL   │
│   [SOFT TURF / MULCH / DRAINED SOIL ONLY]                   │
│   ✖ NO ROCKS  ✖ NO SPRINKLERS  ✖ NO TOYS / DOG HOUSES     │
│                                                             │
└─────────────────────────────────────────────────────────────┘
Mat Depression under Load
When an adult or multiple children bounce on a trampoline, the jumping mat stretches downward 2 to 3 feet toward the ground. If hard objects sit beneath the mat, the jumper can hit them at high speed.
Surface Requirements
- Level Ground: The ground must be level, with less than a 3-degree slope. Sloped ground causes jumpers to drift into the enclosure net and forces the frame to absorb uneven structural weight.
- Clear Ground: Remove all rocks, landscaping timbers, exposed pipes, and pop-up sprinkler heads. Keep pets, toys, and lawnmowers out from underneath the frame.
- Soft Base Material: Natural grass, wood chips, bark mulch, or impact-absorbing rubber tiles are the safest base options.
Critical Warning: Never place a trampoline directly on bare concrete, asphalt, or paving stones without shock-absorbing rubber padding beneath the frame legs. Concrete reflects 100% of kinetic energy back into the frame, causing joint stress and rapid metal fatigue.
5. Regional Space Planning Across US States
Backyard configurations vary widely by state, climate, and local real estate styles. Here is how to handle spatial requirements in different regions:
┌─────────────────────────────────────────────────────────────┐
│             REGIONAL YARD & CLIMATE CHALLENGES              │
├─────────────────────────────────────────────────────────────┤
│                                                             │
│  SAN FRANCISCO & NEW YORK URBAN YARDS                       │
│  • Micro-yards & narrow lots                                │
│  • Solution: Compact oval/rectangular shapes + wall mats    │
│                                                             │
│  TEXAS & SOUTHWEST PROPERTIES                               │
│  • Extreme heat & hard, clay-packed soil                    │
│  • Solution: Shade sails at 20+ ft height + sandbag anchors │
│                                                             │
│  PACIFIC NORTHWEST (WASHINGTON)                             │
│  • Overhanging evergreen canopies & wet soil                │
│  • Solution: Trim evergreen limbs & install gravel drainage │
│                                                             │
└─────────────────────────────────────────────────────────────┘
San Francisco & New York Urban Yards
- The Challenge: Compact urban lots, narrow brownstone yards, and tight lot lines make finding a 6-foot perimeter buffer difficult.
- The Solution: Choose compact oval or rectangular trampolines designed for narrow spaces. If a fence sits within 4 to 5 feet, install weather-resistant padded wall tiles on the fence to cushion potential impacts.
Texas & Southwest Suburbs
- The Challenge: High sun exposure, clay soil that bakes hard in summer, and intense storm winds.
- The Solution: Position the trampoline away from sun-baked concrete patios. If adding a shade sail above the trampoline, mount it at least 20 feet high to prevent jump interference. Always anchor the frame against high winds using heavy sandbags or screw-in ground anchors.
Pacific Northwest (Washington, Oregon)
- The Challenge: Tall evergreen trees (Douglas firs, cedars) with wide, low-hanging branches and damp ground year-round.
- The Solution: Trim lower tree canopies up to 22 feet to maintain overhead safety and prevent moss or sap buildup on the jumping mat. Install a well-drained gravel base with rubber pads under the frame to prevent sinking in muddy soil.
Southern California Residential
- The Challenge: Zero-lot-line properties, backyard pools, and hardscape patios.
- The Solution: Keep the trampoline at least 10 feet away from pool edges and coping. A wet jumper or an accidental bounce toward a pool creates severe slip and drowning hazards.
6. How to Calculate Total Yard Space Needed
To calculate the total footprint required for a trampoline, add 12 feet (6 feet per side) to both the length and width of the trampoline frame.
┌─────────────────────────────────────────────────────────────┐
│               CALCULATING TOTAL SPACE NEEDED                │
├─────────────────────────────────────────────────────────────┤
│                                                             │
│   FORMULA: (Frame Dimension) + (6 ft Left) + (6 ft Right)   │
│                                                             │
│   EXAMPLE: 12-Foot Round Trampoline                         │
│   • Frame Diameter: 12 Feet                                 │
│   • Safety Buffer:  6 Ft + 6 Ft = 12 Feet                   │
│   • TOTAL CLEAR DIAMETER NEEDED = 24 FEET                   │
│                                                             │
└─────────────────────────────────────────────────────────────┘
Yard Space Calculation Matrix
| Trampoline Shape & Size | Frame Footprint | Required Buffer Zone | Total Yard Space Needed |
| 8 ft Round | 8 ft x 8 ft | +6 ft on all sides | 20 ft x 20 ft (400 sq ft) |
| 10 ft Round | 10 ft x 10 ft | +6 ft on all sides | 22 ft x 22 ft (484 sq ft) |
| 12 ft Round | 12 ft x 12 ft | +6 ft on all sides | 24 ft x 24 ft (576 sq ft) |
| 14 ft Round | 14 ft x 14 ft | +6 ft on all sides | 26 ft x 26 ft (676 sq ft) |
| 15 ft Round | 15 ft x 15 ft | +6 ft on all sides | 27 ft x 27 ft (729 sq ft) |
| 8 ft x 12 ft Oval / Rectangular | 8 ft x 12 ft | +6 ft on all sides | 20 ft x 24 ft (480 sq ft) |
| 10 ft x 17 ft Gymnastic Rectangular | 10 ft x 17 ft | +6 ft on all sides | 22 ft x 29 ft (638 sq ft) |
7. Step-by-Step Installation & Site Checklist
Follow this setup procedure to verify your space before unboxing your trampoline:
1.Measure the Perimeter and Mark the Boundary:15 Minutes.
Use a tape measure to mark out the full trampoline diameter plus an extra 6 feet on every side. Use lawn-safe spray paint or stakes to mark the outer perimeter boundary.
2.Perform the Overhead Canopy Check:20 Minutes.
Look straight up from every point within your marked boundary. Verify that no tree branches, power lines, roof eaves, or hanging string lights sit below the 18-foot height line.
3.Check Ground Incline and Clear Debris:30 Minutes.
Place a spirit level on a long straight board across the site. If the slope exceeds 3 degrees (about 1 inch of fall per foot), level the ground by digging down the high side—never build up the low side with loose dirt.
4.Install Impact-Absorbing Underlayment:45 Minutes.
If setting up over packed dirt, gravel, or patio borders, lay down interlocking high-density rubber pads or a 3-to-4-inch layer of bark mulch across the full footprint and fall zone.
5.Assemble, Anchor, and Verify Entry Clearance:60 Minutes.
Assemble the frame, springs, jumping mat, and safety net. Secure the frame with heavy-duty wind anchors (spiral ground anchors for turf; sandbags for hard surfaces). Ensure the zipper door opens away from hard obstacles, leaving at least 6 feet of clear entry space.
8. Essential Safety Tips for Trampoline Site Management
- Maintain Clear Entry Points: Keep the ladder and zipper opening free of shoes, toys, and garden hoses to prevent trip injuries.
- Mow Around the Perimeter First: Trim grass and weeds around and under the frame before assembly. Moving a fully assembled trampoline to mow is difficult and can warp frame joints.
- Inspect Overhead Trees Seasonally: Prune dead or fast-growing branches twice a year to maintain the 18-foot vertical safety ceiling.
- Anchor for Local Weather: High wind gusts can lift unanchored trampolines over fences. Use auger-style ground anchors embedded into firm soil.
- Enforce the “One Jumper at a Time” Rule: Over 75% of trampoline injuries occur when multiple people bounce at once and collide inside the enclosure.
- Lock the Access Zipper When Unattended: Prevent unsupervised young children or neighborhood kids from entering the trampoline area.
9. Frequently Asked Questions (FAQ)
1. Can I put a trampoline right next to a wooden or vinyl fence if it has a safety net?
No. Safety nets flex outward up to 2 feet when a jumper hits them. If the frame sits directly against a fence, the jumper can strike the fence through the net. Always maintain at least 6 feet of open space between the enclosure net and any fence line.
2. How much overhead clearance do I need under a shade tree?
You need at least 18 feet of clear vertical space from the ground up. Prune all low-hanging limbs, twigs, and leaves within this 18-foot canopy zone. Falling leaves, sap, and bird droppings can also degrade the jumping mat over time.
3. What is the minimum yard size for a 14-foot round trampoline?
A 14-foot round trampoline requires a total clear area of at least 26 feet in diameter (14 feet for the frame + 6 feet of safety buffer on each side), equal to roughly 676 square feet of flat, obstacle-free yard space.
4. Can I place a trampoline on a sloped or uneven lawn?
Small inclines (under 3 degrees) are manageable, but steeper slopes are dangerous because they cause jumpers to land close to the lower net wall. To correct a slope, dig out the turf on the uphill side to create a level trench for the legs. Never prop up the downhill legs with loose bricks or wood blocks.
5. How much space do I need between a trampoline and a swimming pool?
Maintain a minimum distance of 10 to 12 feet between a trampoline and the edge of a swimming pool. Trampolines should never be used as launchpads into a pool, as miscalculated jumps can result in dangerous landings on pool coping or concrete decks.
6. Do in-ground trampolines require the same clearance as above-ground models?
Yes. While in-ground trampolines are flush with the lawn (eliminating fall-from-height risks), jumpers can still bounce high and travel laterally. Maintain the same 6-foot lateral clearance from walls, fences, and trees, along with 18 feet of overhead space.
7. How far away should a trampoline be from garden retaining walls or pavers?
Keep the outer edge of the trampoline at least 6 to 8 feet away from retaining walls, stone pavers, or concrete patio borders. If space is tight, cover nearby hard edges with weatherproof foam or rubber safety padding.
8. Is an 8-foot clearance needed for small toddlers’ or kids’ trampolines?
For small indoor/outdoor starter trampolines (under 6 feet in diameter), a 4 to 5 foot lateral buffer zone is usually sufficient, provided the maximum bounce height remains low and an enclosure net is used.
9. How do I anchor a trampoline if I don’t have space for ground stakes?
If placing the trampoline on hard ground or rock where spiral stakes cannot enter, use heavy sandbags designed for trampoline legs. Apply at least 50 to 75 lbs of weight per U-shaped leg to prevent tipping or sliding.
10. Can I install a trampoline under a covered patio or gazebo?
Only if the structure provides at least 18 feet of open ceiling height. Standard residential patio covers sit 8 to 10 feet off the ground, which is dangerously low and creates a severe risk of head or neck injury during a bounce.
Conclusion
Creating a safe backyard trampoline layout comes down to proper spatial planning. By maintaining 6 to 8 feet of lateral space, 18+ feet of overhead headroom, and a level, debris-free base, you can eliminate the most common collision and fall hazards.
Taking the time to measure your yard, trim overhanging branches, and choose the right trampoline shape for your space ensures years of safe outdoor exercise and family fun.


