Trampolines provide years of fun, exercise, and outdoor entertainment for families. Children love jumping, bouncing, and playing with friends, while parents appreciate the physical activity and outdoor play that trampolines encourage. However, like any outdoor equipment, trampolines experience wear and tear over time.
After months or years of use, different trampoline parts may begin to wear out, including:
- Jumping mats
- Springs
- Safety nets
- Padding
- Poles
- Frame sections
Weather exposure, sunlight, rain, wind, heavy jumping, and age can all damage trampoline components. Fortunately, most trampoline problems do not require replacing the entire trampoline. Instead, you can often restore your trampoline by purchasing the correct replacement parts.
The challenge is that trampoline replacement parts must fit properly.
A replacement spring that is too short or too long can affect bounce quality and safety. A safety pad that does not match the frame size may leave springs exposed. A mat with the wrong number of spring holes will not connect correctly.
That is why learning how to measure a trampoline for replacement parts is extremely important.
Many trampoline owners become confused when trying to measure trampoline size, spring length, frame diameter, or enclosure dimensions. Some people mistakenly measure the jumping mat itself instead of the full frame. Others buy parts without counting springs or checking shape compatibility.
These mistakes can lead to:
- Wasted money
- Incorrect fit
- Unsafe trampoline performance
- Difficult installation
The good news is that measuring a trampoline correctly is actually much easier than most people think.
In this detailed guide, we will explain everything you need to know about measuring a trampoline accurately for replacement parts, including trampoline size measurement, spring measurement, net sizing, mat sizing, frame identification, safety pad measurements, common mistakes, helpful tools, and safety tips.
Why Accurate Trampoline Measurements Matter
Replacement parts must match the trampoline precisely.
Even small measurement mistakes can create major problems.
Incorrect parts may cause:
- Loose fitting mats
- Weak bounce performance
- Safety risks
- Installation difficulties
- Uneven tension
Accurate measurements ensure:
- Proper fit
- Safe performance
- Longer trampoline lifespan
- Better jumping quality
Before ordering any replacement part, measuring carefully is essential.
Common Trampoline Parts That Need Replacement
Different trampoline parts wear out at different rates.
The most commonly replaced components include:
- Jumping mats
- Springs
- Safety pads
- Enclosure nets
- Poles
- Frame sections
Each part requires different measurements.
Tools You Need to Measure a Trampoline
Fortunately, measuring a trampoline requires only a few basic tools.
Helpful tools include:
- Measuring tape
- Notepad
- Pen or pencil
- Smartphone camera
- Ladder (sometimes)
- Helper for large trampolines
A flexible tape measure works best for accurate results.
Understanding Trampoline Shapes
Before measuring, identify the trampoline shape.
Common trampoline shapes include:
- Round
- Rectangular
- Oval
- Square
Shape matters because replacement parts are shape-specific.
A rectangular mat will not fit a round trampoline.
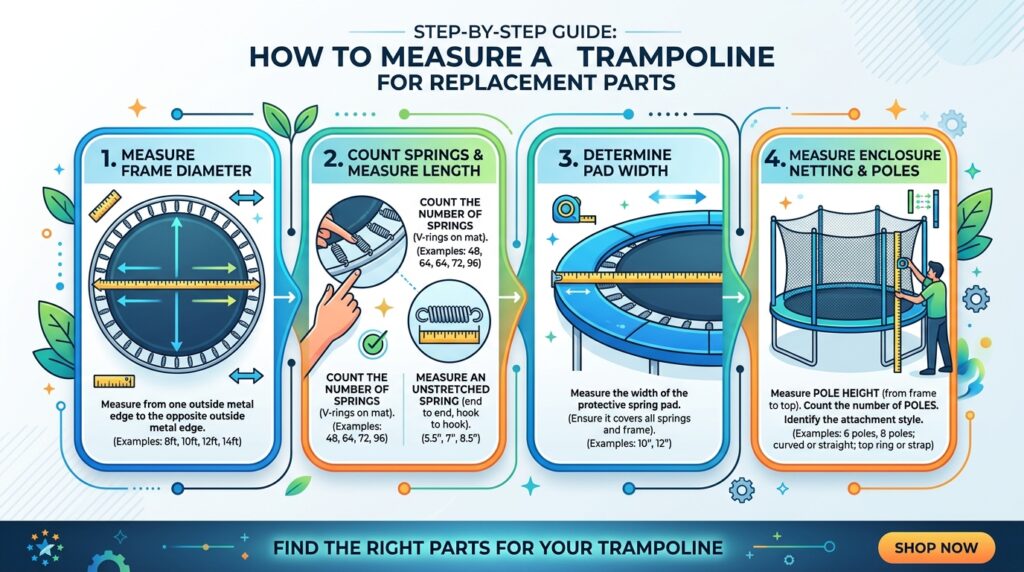
How to Measure a Round Trampoline
Round trampolines are the most common type.
To measure a round trampoline correctly:
- Measure from the outer edge of the metal frame straight across to the opposite outer edge.
- Do not measure the jumping mat.
- Measure the metal frame only.
- Measure in two directions to confirm accuracy.
For example:
- One side may measure 10ft
- Another side may measure 10ft 1 inch
Use the average measurement.
Why Frame Measurement Matters
Many beginners accidentally measure:
- The jumping surface
- Inside frame diameter
- Safety net size
But replacement parts usually require:
Full outer frame diameter
This is the standard trampoline size.
Common Round Trampoline Sizes
Popular sizes include:
- 8ft
- 10ft
- 12ft
- 14ft
- 15ft
- 16ft
Manufacturers typically round measurements slightly.
For example:
- 13ft 10in is usually sold as 14ft
Measuring a Rectangular Trampoline
Rectangular trampolines require two measurements:
- Length
- Width
Measure from outer frame edge to outer frame edge.
Example:
- 10ft x 17ft
Always measure the metal frame, not the mat.
Measuring an Oval Trampoline
Oval trampolines also require:
- Longest length
- Widest width
Again, use the outside frame dimensions only.
Measuring a Square Trampoline
Square trampolines require measurements from:
- One outer frame edge to the opposite edge
Most square trampolines use equal dimensions such as:
- 10ft x 10ft
- 14ft x 14ft
How to Measure Trampoline Springs
Springs are one of the most frequently replaced trampoline parts.
Incorrect spring size can ruin trampoline performance.
Why Spring Measurement Is Important
Springs control:
- Bounce quality
- Mat tension
- Jump consistency
Wrong spring lengths may cause:
- Uneven jumping
- Excessive strain
- Unsafe performance
How to Measure Springs Correctly
Important rule:
Measure springs when removed from the trampoline.
Do not measure stretched installed springs.
Steps for Measuring Trampoline Springs
- Remove one spring carefully.
- Lay the spring flat.
- Measure from hook end to hook end.
- Include the hooks in the measurement.
Example:
- 5.5 inches
- 7 inches
- 8.5 inches
Counting Springs Matters Too
When replacing a trampoline mat, you must also count the total number of springs.
A mat designed for:
- 72 springs
will not fit a trampoline using:
- 80 springs
Count carefully.
Why Spring Count Is Critical
Even if trampoline diameter matches, different models may use different spring counts.
Spring count affects:
- Mat compatibility
- Tension distribution
- Bounce quality
Never skip counting springs.
Measuring the Trampoline Mat
The trampoline mat is the jumping surface.
Replacing a worn mat is common after years of use.
Common Signs of Worn Mats
Replace trampoline mats if you notice:
- Tears
- Fraying
- Holes
- Weak stitching
- Sun damage
Damaged mats can become dangerous.
How to Measure a Trampoline Mat
You usually need three measurements:
- Trampoline frame size
- Spring length
- Total spring count
Example:
- 14ft trampoline
- 72 springs
- 7-inch springs
This combination identifies the correct mat.
Do Not Measure the Old Mat Alone
Old mats often stretch over time.
Using stretched mat dimensions may produce incorrect replacement sizes.
Instead, combine:
- Frame size
- Spring size
- Spring count
for best accuracy.
Measuring Trampoline Safety Pads
Safety pads cover springs and frame edges.
Pads reduce injury risk by cushioning impacts.
Why Safety Pad Size Matters
Pads that are too small expose springs.
Pads that are too large may shift or fold.
Proper fit improves safety.
How to Measure Safety Pads
You usually need:
- Trampoline frame size
- Pad width
- Trampoline shape
Pad width measures from:
- Outer edge
to - Inner edge
Measuring Pad Thickness
Thickness also matters.
Thicker pads generally provide:
- Better protection
- More durability
- Improved comfort
Measure foam thickness if replacing premium pads.
Measuring Trampoline Nets
Safety enclosure nets are extremely important.
They help prevent falls from the trampoline.
Why Nets Require Accurate Measurement
Nets must match:
- Trampoline size
- Pole count
- Pole placement
- Net style
Incorrect nets may not attach properly.
Types of Trampoline Nets
Common net styles include:
- Inside enclosure nets
- Outside enclosure nets
The attachment system affects compatibility.
Inside vs Outside Nets
Inside Nets
These attach inside the springs.
Advantages:
- Better jumper protection
- Reduced spring contact
Outside Nets
These attach around outer frame edges.
Advantages:
- Larger jumping area
Measure carefully because replacement styles differ.
How to Measure Enclosure Nets
You need several measurements:
- Trampoline size
- Pole count
- Pole height
- Net attachment style
Counting Enclosure Poles
Count total vertical poles supporting the net.
Common counts include:
- 6 poles
- 8 poles
- 10 poles
Incorrect pole counts prevent proper installation.
Measuring Pole Height
Measure from:
- Frame level
to - Top of pole
Pole height helps determine net compatibility.
Measuring Pole Diameter
Pole diameter matters when replacing:
- Foam sleeves
- Pole caps
- Hardware
Use a tape measure or ruler carefully.
Measuring Trampoline Frame Tubing
Sometimes frame parts require replacement.
Frame tubing measurements include:
- Diameter
- Length
- Thickness
This helps match replacement sections.
Why Manufacturer Information Helps
If the trampoline label still exists, it may include:
- Brand
- Model number
- Size
- Serial number
This makes replacement part identification easier.
Where to Find Trampoline Labels
Labels are often located:
- On frame tubing
- Near ladder area
- Under jumping mat
Take photos before labels fade.
Measuring Older Trampolines Without Labels
Older trampolines may lack readable labels.
In that case:
- Measure carefully manually
- Count springs
- Identify shape
- Photograph frame connections
This helps suppliers identify compatible parts.
Common Trampoline Measurement Mistakes
Many people make similar measurement errors.
Measuring the Jumping Surface Instead of the Frame
This is the most common mistake.
Always measure:
Outer metal frame edge to outer metal frame edge
Forgetting to Count Springs
Two trampolines with identical sizes may use different spring counts.
Always count carefully.
Measuring Springs While Installed
Installed springs stretch under tension.
Remove springs before measuring.
Ignoring Trampoline Shape
Replacement parts are shape-specific.
Always identify whether trampoline is:
- Round
- Rectangular
- Oval
- Square
Assuming All Brands Use Standard Sizes
Different brands sometimes use unique dimensions.
Never assume compatibility without measuring.
Why Accurate Measurements Improve Safety
Properly fitted parts improve trampoline safety significantly.
Correct parts help ensure:
- Balanced tension
- Stable bouncing
- Proper enclosure performance
Poorly fitting parts increase accident risk.
How Weather Affects Trampoline Wear
Outdoor trampolines experience constant weather exposure.
Common causes of wear include:
- UV sunlight
- Rain
- Wind
- Snow
- Temperature changes
Replacement parts eventually become necessary.
Extending Trampoline Lifespan
Good maintenance reduces replacement frequency.
Helpful maintenance tips include:
- Using weather covers
- Removing debris
- Inspecting regularly
- Avoiding overloading
Regular care protects trampoline components.
When to Replace Springs
Springs should be replaced if they show:
- Rust
- Stretching
- Cracks
- Weak bounce
- Bent hooks
Old springs reduce performance and safety.
When to Replace the Mat
Replace mats if you notice:
- Holes
- Torn stitching
- Weak fabric
- Sun damage
Never continue using damaged mats.
When to Replace Nets
Safety nets should be replaced if:
- Torn
- Loose
- Brittle
- UV damaged
Damaged nets may fail during falls.
When to Replace Padding
Replace pads if foam becomes:
- Thin
- Cracked
- Exposed
- Waterlogged
Good padding protects jumpers from springs.
Importance of Regular Inspections
Inspect trampolines regularly for:
- Rust
- Loose bolts
- Worn stitching
- Frame cracks
Early detection prevents larger problems.
Should You Replace All Springs Together?
Replacing all springs together is often recommended.
New and old springs mixed together may create:
- Uneven tension
- Uneven bounce
Uniform springs improve performance.
Can You Upgrade Trampoline Parts?
Some owners upgrade components such as:
- Thicker pads
- Stronger springs
- Premium nets
However, upgrades must remain compatible with the frame.
Using Online Measurement Charts
Many trampoline suppliers provide compatibility charts.
These may help identify:
- Mat size
- Spring count
- Net style
Still verify measurements personally before ordering.
Taking Photos Helps
Photographs help when contacting suppliers.
Take photos of:
- Frame
- Springs
- Pole connections
- Net attachment points
Visual references reduce mistakes.
Why Cheap Replacement Parts Can Be Risky
Low-quality parts may:
- Wear out quickly
- Fit poorly
- Reduce safety
High-quality materials provide better long-term value.
Importance of Proper Installation
Even perfectly measured parts require correct installation.
Improper assembly may cause:
- Uneven tension
- Loose nets
- Unsafe bounce
Follow manufacturer instructions carefully.
Working Safely While Measuring
Trampolines contain tensioned springs.
Safety precautions include:
- Wearing gloves
- Using spring pull tools
- Keeping children away
Springs can snap back forcefully.
Measuring With a Helper
Large trampolines are easier to measure with assistance.
Helpers improve:
- Accuracy
- Safety
- Efficiency
Especially when measuring diameter.
Indoor Trampoline Measurements
Mini fitness trampolines use similar measurement principles.
Measure:
- Frame diameter
- Spring size
- Mat attachment style
Indoor rebounders also require accurate replacement parts.
Trampoline Replacement Costs
Replacement costs vary depending on:
- Size
- Brand
- Part type
- Material quality
Replacing parts is usually cheaper than buying a whole new trampoline.
Environmental Benefits of Replacing Parts
Replacing damaged components reduces waste.
Repairing trampolines instead of discarding them supports sustainability.
Final Thoughts
Learning how to measure a trampoline for replacement parts is one of the most important skills for trampoline owners. Accurate measurements help ensure that replacement mats, springs, nets, pads, and frame parts fit properly, perform safely, and extend the life of the trampoline.
The most important measurement rules include:
- Measure the outer metal frame, not the jumping surface
- Count springs carefully
- Measure springs while removed
- Identify trampoline shape correctly
- Measure enclosure poles and net style accurately
Small mistakes can lead to:
- Poor fitting parts
- Unsafe bouncing
- Installation frustration
- Wasted money
Fortunately, measuring a trampoline becomes much easier once you understand the process. With a tape measure, careful attention, and a few simple steps, most trampoline owners can confidently identify the correct replacement parts for their equipment.
Regular inspections and timely replacement of worn components also improve trampoline safety significantly. Damaged mats, weak springs, torn nets, and worn pads should never be ignored because they increase injury risk for children and adults alike.
A well-maintained trampoline can provide many additional years of safe outdoor fun, exercise, laughter, and family memories.
By measuring carefully and choosing the correct replacement parts, trampoline owners can restore bounce quality, improve safety, save money, and continue enjoying their trampoline for years to come.

