


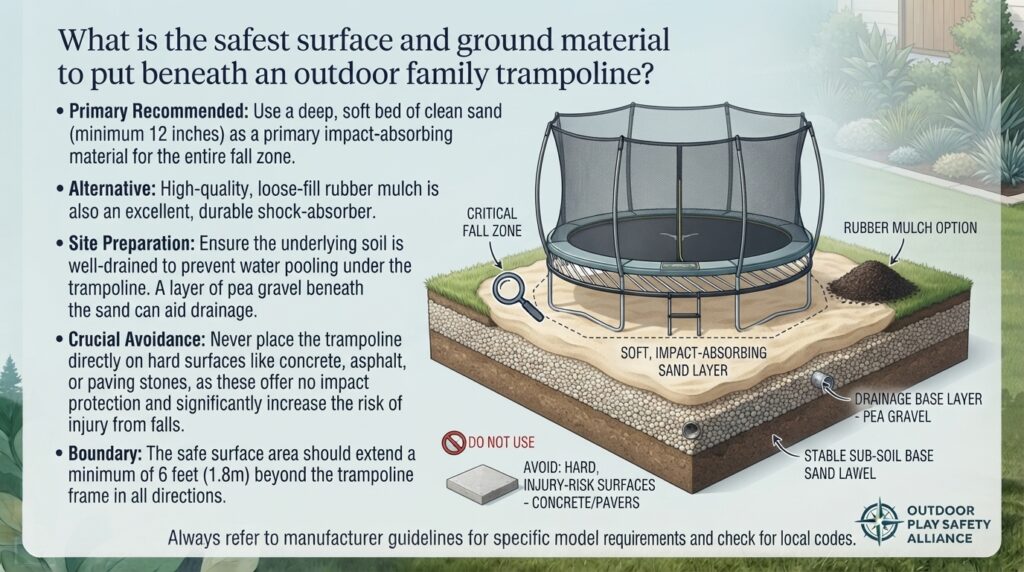
What is the safest surface and ground material to put beneath an outdoor family trampoline? Installing an outdoor family trampoline is one of the best investments you can make for backyard fun, exercise, and burning off endless kids’ energy. However, according to pediatric health data, over 100,000 emergency room visits per year in the United States stem from trampoline injuries—with the vast majority of severe injuries resulting from awkward landings or falls onto unforgiving ground.
Choosing the right surface and ground material beneath and around your trampoline frame is the single most critical safety step you can take to protect your family.
Whether you live in the humid conditions of Houston, the extreme dry heat of Phoenix, the rain of Seattle, or a densely populated suburban neighborhood in California, this ultimate 3,000-word safety guide breaks down every ground surface option, installation step, regional consideration, and maintenance requirement to keep your jumpers safe.
Quick Summary: Surfacing Options at a Glance
If you are looking for a rapid comparison, the table below highlights how the top ground materials score based on shock absorption, critical fall height rating, maintenance, and long-term costs.
| Ground Material | Safety Rating (ASTM F1292) | Recommended Depth | Typical Cost per Sq. Ft. | Lifespan | Primary Drawback |
| Rubber Mulch | Highest (10-12 ft drop protection) | 3 – 6 inches | $2.50 – $4.50 | 10–15 Years | Holds summer heat in dry, hot climates |
| Engineered Wood Fiber (EWF) | High (7-10 ft drop protection) | 9 – 12 inches | $1.50 – $2.50 | 2–4 Years | Requires periodic topping off & raking |
| Natural Grass | Moderate (Dependent on soil/season) | N/A (Level lawn) | $0.50 – $1.50 | Seasonal | Hardens into packed dirt; creates dead grass zones |
| Synthetic Turf + Shock Pad | High to Very High | 1–2″ Pad + Turf | $6.00 – $12.00 | 10–12 Years | High upfront professional installation cost |
| Interlocking Rubber Tiles | High | 1.5 – 2.5 inches | $4.00 – $8.00 | 8–10 Years | Must be placed over a flat, hard sub-base |
| Play Sand | Moderate (Compacts when wet) | 9 inches | $1.00 – $2.00 | 3–5 Years | Tracks inside, attracts pets/neighborhood cats |
| Concrete / Asphalt / Pavers | UNSAFE (DO NOT USE) | N/A | High | N/A | Zero shock absorption; high risk of severe trauma |
Section 1: The Physics of Trampoline Safety & Fall Hazards
To understand why surface choice matters, you have to look at how trampoline energy transfers during a jump or a fall.
       [ FREE CLEARANCE ZONE: 18-24 FT ABOVE ]
                       │
                       ▼
            ┌─────────────────────┐
            │  Enclosure Netting  │
            └──────────┬──────────┘
                       │
                       ▼
      ┌─────────────────────────────────┐
      │     Trampoline Mat & Frame      │
      └────────────────┬────────────────┘
                       │
                       ▼
 ═══════════════════════════════════════════════
   IMPACT & FALL ZONE (Minimum 6-Ft Perimeter)
   Recommended: Rubber Mulch (3-6") or EWF (9-12")
 ═══════════════════════════════════════════════
                       │
                       ▼
           [ Well-Drained Sub-Base Ground ]
When a child or adult jumps on a trampoline, kinetic energy builds up. If a jumper exits the trampoline unexpectedly—whether by jumping off intentionally, falling through an unzipped net door, or tearing through a worn net—they convert potential energy into downward kinetic force.
Understanding “Critical Fall Height” (ASTM F1292)
The American Society for Testing and Materials (ASTM) sets safety standards (specifically standard ASTM F1292) for playground impact attenuation. This standard measures Critical Fall Height—the maximum fall height from which a child could land head-first onto a surface without suffering a fatal or life-altering traumatic brain injury (TBI) or skull fracture.
- Concrete / Asphalt: Critical Fall Height = 0 inches (Zero energy absorption).
- Packed Dirt / Baked Clay: Critical Fall Height = Less than 1 foot.
- Natural Lawn Grass: Critical Fall Height = 1 to 3 feet (Varies wildly based on moisture and soil compaction).
- Rubber Mulch (4 inches deep): Critical Fall Height = 10 to 12+ feet.
Because standard outdoor family trampolines sit between 3 feet and 3.5 feet off the ground, a jumper standing upright on the jumping mat has a head height of 7 to 10 feet above ground level. This makes installing a surface rated for at least a 7- to 10-foot critical fall height essential.
Section 2: In-Depth Analysis of Every Ground Material
1. Recycled Rubber Mulch (The Gold Standard)
   ┌─────────────────────────────────────────────────────────┐
   │ 3" - 4" Loose-Fill Recycled Shredded Rubber Mulch       │
   ├─────────────────────────────────────────────────────────┤
   │ Heavy-Duty Commercial Landscape Fabric (Weed Barrier)   │
   ├─────────────────────────────────────────────────────────┤
   │ Levelled Sub-Grade Soil / Compacted Dirt Base           │
   └─────────────────────────────────────────────────────────┘
Shredded rubber mulch—typically manufactured from recycled non-wire passenger vehicle tires—consistently ranks as the safest overall surface material under trampolines.
- Impact Protection: Outstanding. A 3- to 4-inch layer absorbs impact force exceptionally well, providing a critical fall height protection rating exceeding 10 feet.
- Durability: Rubber does not decompose, rot, or absorb water. It stays soft year-round and does not freeze into a hard mass during winter.
- Maintenance: Low. It doesn’t blow away easily in wind storms due to its weight and density.
- Drawbacks: Absorbs solar radiation. In sun-drenched states like Texas, California, or southern inland locations, dark rubber mulch can heat up significantly on 100°F+ summer days. Opting for lighter-colored coatings (buff, green, or tan) helps reduce heat retention.
2. Engineered Wood Fiber (EWF) / Playground Mulch
   ┌─────────────────────────────────────────────────────────┐
   │ 9" - 12" Engineered Wood Fiber (Compacts over time)     │
   ├─────────────────────────────────────────────────────────┤
   │ Heavy-Duty Commercial Landscape Fabric                  │
   ├─────────────────────────────────────────────────────────┤
   │ Levelled Sub-Grade Soil + Drainage Layer                │
   └─────────────────────────────────────────────────────────┘
Engineered Wood Fiber is not standard landscaping bark or garden wood chips. EWF is manufactured specifically from clean, virgin softwoods processed into fibrous, interlocking wood strands.
- Impact Protection: Excellent when properly installed at a depth of 9 to 12 inches. The fibrous strands interlock under foot traffic to form a firm, springy mat that cushions impacts.
- Natural Aesthetic: Integrates seamlessly into residential landscaping and garden borders.
- Cost Efficiency: Costs significantly less per square foot upfront than rubber mulch or synthetic turf.
- Drawbacks: Decomposes naturally over time. You must top off the pit every 18 to 24 months to maintain the required safety depth. It can harbor natural molds or fungi in damp, humid climates.
3. Natural Grass Lawn
Natural grass is the most common surface used under backyard trampolines because it’s already there. However, it comes with hidden safety and maintenance traps.
- The Pros: Natural look, zero immediate installation cost, soft to touch.
- The Hidden Risks:
- Grass Death: The trampoline mat blocks direct sunlight, killing the grass beneath it within weeks.
- Soil Compaction: Frequent jumping and foot traffic compress the exposed dirt underneath, turning soft turf into rock-hard packed earth with minimal shock absorption.
- Mowing Friction: Moving a 150–250 lb trampoline every single time you mow the lawn is a massive physical chore. Mow around it, and weeds will climb the frame legs and springs.
Safety Warning: If you place your trampoline on grass, inspect the soil underneath monthly. If the earth feels as hard as concrete during dry summer months, add safety padding or switch to a loose-fill surface.
4. Synthetic Turf with Underlayment Shock Pads
   ┌─────────────────────────────────────────────────────────┐
   │ Non-Abrasive Artificial Turf Layer                      │
   ├─────────────────────────────────────────────────────────┤
   │ 1.5" to 2.0" High-Density EVA Foam Shock Attenuation Pad│
   ├─────────────────────────────────────────────────────────┤
   │ Compacted Crushed Limestone Sub-Base (Drainage Layer)   │
   └─────────────────────────────────────────────────────────┘
For homeowners seeking a clean, pristine look, synthetic turf combined with a commercial-grade foam shock pad is an increasingly popular high-end option.
- Impact Protection: High, provided you install a minimum 1.5-inch thick padded foam underlayment beneath the turf backing. Synthetic turf installed directly over dirt or concrete offers inadequate shock absorption.
- Pros: Clean look, zero mowing, zero mud, no loose materials tracked into the house, excellent weather resistance.
- Cons: Expensive ($8.00–$15.00+ per sq. ft installed). Turf can become hot in direct, unshaded sunlight.
5. Interlocking Rubber Tiles (For Patios & Concrete Hardscape)
   ┌─────────────────────────────────────────────────────────┐
   │ 2.0" Heavy-Duty Interlocking High-Density Rubber Tiles   │
   ├─────────────────────────────────────────────────────────┤
   │ Existing Flat Concrete Patio / Asphalt Base             │
   └─────────────────────────────────────────────────────────┘
If your yard space forces you to place a trampoline over a flat hard surface like a concrete patio, paver yard, or driveway, interlocking rubber tiles are mandatory.
- Features: Heavy, high-density rubber tiles (1.5″ to 2.5″ thick) interlock to create a stable, shock-absorbing floor.
- Coverage: You must extend the tile perimeter at least 6 feet past the frame in all directions to cover the full safety fall zone.
- Important: Even with rubber tiles, placing a trampoline over concrete is a secondary option. Placing it on soft ground with loose-fill material remains significantly safer.
Section 3: Ground Preparation & DIY Installation Guide
A safe trampoline installation requires proper site preparation. Placing a trampoline on sloping or unprepared ground leads to structural stress, tipping risks, and unpredictable bounces.
   STEP 1: Measure & Clear Space (6-ft Fall Zone Radius)
                        │
                        ▼
   STEP 2: Level the Sub-Grade (Max 1-2 inch slope across 15 ft)
                        │
                        ▼
   STEP 3: Install Timber / Composite Retaining Border
                        │
                        ▼
   STEP 4: Lay Heavy-Duty Woven Weed Barrier Fabric
                        │
                        ▼
   STEP 5: Fill Loose Material & Set Trampoline Anchors
Step 1: Site Selection & Clearance Checks
Select a flat section of your yard. You must maintain two critical clearance zones:
- Vertical Clearance: Ensure there is at least 18 to 24 feet of clear vertical space above the mat, free from tree branches, utility power lines, or roof eaves.
- Lateral Fall Zone Clearance: Ensure there is a minimum of 6 feet (preferably 8 feet) of unobstructed space around the entire outer perimeter of the trampoline frame. Keep this zone completely clear of fences, brick walls, shed edges, play sets, and garden rocks.
Step 2: Excavation and Digging the Surfacing Pit
If you choose a loose-fill surface like Rubber Mulch or Wood Fiber, digging a shallow retaining pit keeps the material neatly contained.
- Mark a circle or square extending 3 to 6 feet wider than your trampoline frame in all directions.
- Excavate the turf and topsoil to a depth of 4 inches (for rubber mulch) or 8 to 10 inches (for engineered wood fiber).
- Use a carpenter’s level on a long 2×4 board across the excavation area to ensure the pit floor is level.
Step 3: Installing Border Edging & Landscape Fabric
- Edging: Install 4×4 treated timber beams, heavy-duty composite lawn edging, or rubber playground borders around the perimeter to keep loose-fill material contained.
- Weed Fabric: Lay down a heavy-duty, woven commercial-grade geotextile landscape fabric across the excavated dirt. Secure it with 6-inch landscape staples every 2 feet. This fabric prevents weeds from growing through your loose-fill material while allowing rainwater to drain freely into the subsoil.
Step 4: Filling and Leveling Loose Surfacing
Pour in your selected safety material (e.g., 3 to 4 inches of rubber mulch or 9 to 12 inches of EWF). Rake the surface completely flat using a heavy metal garden rake.
Section 4: Regional Considerations & Climate Factors
Your geographical region directly impacts how ground materials perform over time.
1. High Heat & Sun Exposure (e.g., Texas, Southern California)
- The Challenge: Extreme heat and intense UV radiation degrade plastics and heat up dark surfaces.
- Best Choice: Light-colored Rubber Mulch, Light Engineered Wood Fiber, or Natural Grass under shade sails.
- Pro Tip: If using synthetic turf or rubber mulch in sunny areas, install a high-density UV-blocking shade sail directly over the trampoline zone. This keeps the jump mat and ground material up to 20°F cooler.
2. High Rainfall & Humidity (e.g., Washington, Gulf Coast)
- The Challenge: Heavy precipitation causes soil erosion, wood rot, standing water, and mold accumulation.
- Best Choice: Recycled Rubber Mulch or Pea Gravel with a dedicated rubber safety mat overlay.
- Pro Tip: Always dig a French drain or add a 2-inch washed crushed stone base layer underneath your weed barrier to facilitate fast drainage during heavy downpours.
3. Freezing Winters (e.g., Inland/Northern Climates)
- The Challenge: Moist organic surfaces like wood chips, dirt, and sand freeze solid during sub-zero temperatures, turning shock-absorbing ground into ice-hard rock.
- Best Choice: Recycled Rubber Mulch. Rubber contains almost no moisture, meaning it retains its cushioning ability even in below-freezing temperatures.
Section 5: Essential Trampoline Anchor Systems
Even the safest ground surface won’t prevent injuries if high winds lift your trampoline frame and overturn it. High-wind anchor systems are essential for every backyard installation.
                     ┌───────────────────────────┐
                     │   Trampoline Frame Leg    │
                     └─────────────┬─────────────┘
                                   │
                     ┌─────────────┴─────────────┐
                     │ High-Strength Webbing     │
                     │ Heavy-Duty Ratchet Strap  │
                     └─────────────┬─────────────┘
                                   │
 ══════════════════════════════════╪═════════════════════════════════ GROUND LEVEL
                                   │
                     ┌─────────────┴─────────────┐
                     │  Steel Corkscrew Anchor   │
                     │  (12" - 18" Deep in Earth)│
                     └───────────────────────────┘
Anchor Types by Surface:
- Soil / Grass / Mulch Pits: Use 12- to 18-inch Steel Corkscrew/Auger Anchors. Screw the augers deep into the dirt adjacent to each U-shaped frame leg and secure them tightly using heavy-duty webbing straps with steel ratchets.
- Hardscape / Concrete: Use Heavy-Duty Sandbags (minimum 50–75 lbs per leg) placed directly over each leg base, or install concrete expansion anchors with steel strap tie-downs.
Section 6: Maintenance Checklists & Long-Term Care
To ensure your ground surfacing continuously meets safety specifications, follow this maintenance schedule:
Monthly Inspection Checklist:
- [ ] Rake Loose-Fill: Rake loose materials (rubber or wood mulch) back toward high-impact landing zones, such as right in front of the net exit door.
- [ ] Measure Depth: Insert a tape measure or depth gauge into loose-fill beds to ensure you maintain a minimum depth of 4 inches for rubber mulch or 9 inches for wood fiber.
- [ ] Check Frame Level: Place a spirit level on the frame rail to ensure the legs haven’t settled unevenly into soft soil.
- [ ] Inspect Anchors: Verify that all anchor straps are tight, corrosion-free, and securely fastened into the ground.
Seasonal / Annual Tasks:
- [ ] Top Off Organic Mulch: Add 2 to 3 inches of fresh Engineered Wood Fiber every 1 to 2 years to replace decomposed material.
- [ ] Clean Rubber Surfaces: Wash rubber tiles or rubber mulch once a year with a mild garden hose spray to clear away fine dirt, pollen, and leaves.
- [ ] Check Net Integrity: Inspect the safety enclosure net for UV degradation, small tears, or fraying ropes. Replace nets every 2 to 3 years regardless of visible wear.
Frequently Asked Questions (FAQ)
1. Is it safe to put a family trampoline on hard concrete or pavers?
No, putting a trampoline directly on concrete, asphalt, or pavers without a safety surface is unsafe. Concrete offers zero impact absorption. A fall onto concrete can cause severe bone fractures or traumatic brain injuries. Additionally, the force of jumping on concrete creates severe vibration feedback through the frame legs, causing metal fatigue, weld cracking, and frame instability. If you must use a concrete area, install 2-inch thick rubber playground safety tiles across the footprint plus a 6-foot perimeter fall zone.
2. Is rubber mulch safe for children and pets?
Yes, modern commercial playground rubber mulch manufactured for residential and park use is non-toxic and thoroughly processed to remove steel wire belts. Reputable playground rubber mulch brands are certified to ASTM F3012 standards, ensuring they are free of harmful chemical leaching, heavy metals, or hazardous phthalates. Furthermore, unlike wood mulch, rubber mulch does not attract termites, carpenter ants, or wasps, nor does it harbor mold spores.
3. How deep should wood chips or mulch be beneath an outdoor trampoline?
For standard landscape wood chips or Engineered Wood Fiber (EWF), maintain a minimum compressed depth of 9 inches (installing at 12 inches initially to account for compression). This depth provides critical fall height shock attenuation for drops up to 7 to 10 feet. For loose-fill rubber mulch, a shallower depth of 3 to 4 inches is sufficient to achieve equivalent or superior impact absorption.
4. Can I set up my trampoline on a sloped or uneven lawn?
You should never assemble or use a trampoline on a slope greater than 3 degrees (a 3-inch vertical drop over a 10-foot span). Bouncing on an uneven surface directs jumpers down toward the low side, increasing the risk of falling into the net frame or tipping the entire structure over. To set up a trampoline on a slight slope, dig down the high-side lawn to create a flat, level trench for the upper legs—do not prop up the low-side legs with loose wooden blocks or bricks, as they can slip out during use.
5. Will putting a trampoline on natural grass ruin my lawn permanently?
It won’t ruin your yard permanently, but it will kill the grass directly underneath the frame within a few weeks due to lack of sunlight. The bare ground under the trampoline will eventually turn into a dusty pit in dry weather and a muddy mess when it rains. To prevent this without building a mulch pit, move the trampoline 10 to 15 feet across the lawn every 2 to 3 weeks to give the grass sunlight and recovery time.
6. Do I still need safety ground material if my trampoline has an enclosure net?
Yes, absolutely. While a safety enclosure net is a vital protective feature, nets can fail over time due to UV degradation, unzipped entrance doors, torn mesh, or broken support poles. According to playground safety studies, up to 20% of severe trampoline injuries occur when jumpers collide with net poles or fall through worn netting. Having a certified shock-absorbing surface beneath and around the trampoline provides essential backup fall protection.
7. What is the difference between standard garden mulch and Engineered Wood Fiber (EWF)?
Standard garden mulch or decorative bark consists of unevenly shredded tree bark, leaves, and soft organic matter designed for moisture retention around plants. It decomposes quickly, splinters easily, and offers inconsistent impact protection. Engineered Wood Fiber (EWF) is manufactured specifically for play zones using clean wood that is processed into fibrous strands. These strands interlock under impact to create a stable, springy, impact-attenuating pad.
8. How far beyond the trampoline frame should the protective safety material extend?
The impact surface zone must extend a minimum of 6 feet in all directions beyond the outer metal frame of the trampoline. For large rectangular or round trampolines (14 to 16 feet), extending the perimeter safety surfacing to 8 feet around the entry/exit ladder area offers optimal fall protection.
9. Can I use sand or pea gravel beneath an outdoor trampoline?
While sand and pea gravel are cheap loose-fill materials, they are not recommended as top-tier trampoline surfaces. Sand compacts over time when wet, becoming hard and losing its cushioning ability. It also tracks into houses on shoes and attracts neighborhood cats. Pea gravel shifts underfoot, provides poor shock attenuation unless installed very deep over specialized rubber base mats, and poses a mild projectile or abrasion risk if kicked up onto the jumping mat.
10. How do I anchor down a trampoline installed over rubber mulch or wood fiber?
When installing a loose-fill mulch pit, drive your steel corkscrew anchors through the loose-fill layer and deep into the underlying solid sub-soil floor before pouring in the full depth of mulch. Secure the ratchet straps from the subterranean anchor heads up to the lower U-shaped steel frame legs. This ensures the trampoline is anchored directly to solid earth rather than loose, shifting surface material.
Conclusion
Creating a safe backyard trampoline setup comes down to a few key decisions: selecting an appropriate site, leveling the ground, installing proper safety surfacing, and keeping the frame securely anchored.
- For maximum safety and lowest maintenance: Invest in a 3- to 4-inch deep bed of certified Recycled Rubber Mulch contained within a landscape border.
- For an affordable, natural-looking surface: Install a 9- to 12-inch bed of Engineered Wood Fiber (EWF).
- For a premium, low-profile look: Opt for Synthetic Playground Turf installed over a certified 1.5-inch foam shock pad.
Avoid placing your trampoline directly on hard surfaces like concrete, pavers, or hard-packed dirt. By investing in the right ground surface, you can enjoy peace of mind knowing your family has a safe space for outdoor fun!


