
Yes, you can absolutely use a shade sail above a trampoline—and in almost every case, it is significantly safer, cleaner, and better for your trampoline than placing it directly under trees.
While natural tree canopies offer quick shade, placing a trampoline under trees introduces serious hazards: falling limbs, tree sap, pine needles, bird droppings, and leaf debris that degrade the jumping mat and spring padding. A properly installed shade sail blocks up to 98% of harmful ultraviolet (UV) rays, lowers surface temperatures by as much as 15°F to 20°F, and keeps the jumping area completely free of tree hazards.
Whether you are battling intense summer heat in Texas, coastal UV exposure in California and San Francisco, humid summers in New York, or seasonal weather shifts in Washington state, this comprehensive guide walks you through setup, safety rules, hardware selection, regional considerations, and long-term care.
1. Shade Sail vs. Natural Tree Canopy: Detailed Comparison
Before installing a shade sail, it helps to understand why tree shade presents hidden risks for backyard trampolines.
| Feature | Shade Sail Above Trampoline | Placing Trampoline Under Trees |
| Overhead Safety | High: Lightweight fabric poses zero crush risk if knocked loose. | Low: Falling limbs, pinecones, and storm debris can injure jumpers or tear the mat. |
| UV Protection | 90% to 98% consistent UV block (HDPE woven mesh). | Variable shade depending on sun angle and leaf density. |
| Cleanliness & Maintenance | Very High: Keeps bird droppings, sap, and falling leaves off the mat. | Low: Requires constant sweeping; tree sap permanently stains mats and pads. |
| Equipment Longevity | Extends lifespan by 3–5 years by preventing UV degradation of stitching and netting. | Sap and mildew shorten mat and pad lifespans. |
| Airflow & Temperature | Permeable shade cloth allows heat to escape upward. | Traps heat and humidity under lower canopy branches. |
| Wind Resistance | High (if installed permeable with tensioned turnbuckles). | Trees risk dropping “widowmaker” branches during storm wind gusts. |
2. Key Clearance Rules: Height, Jump Clearance, and Angle
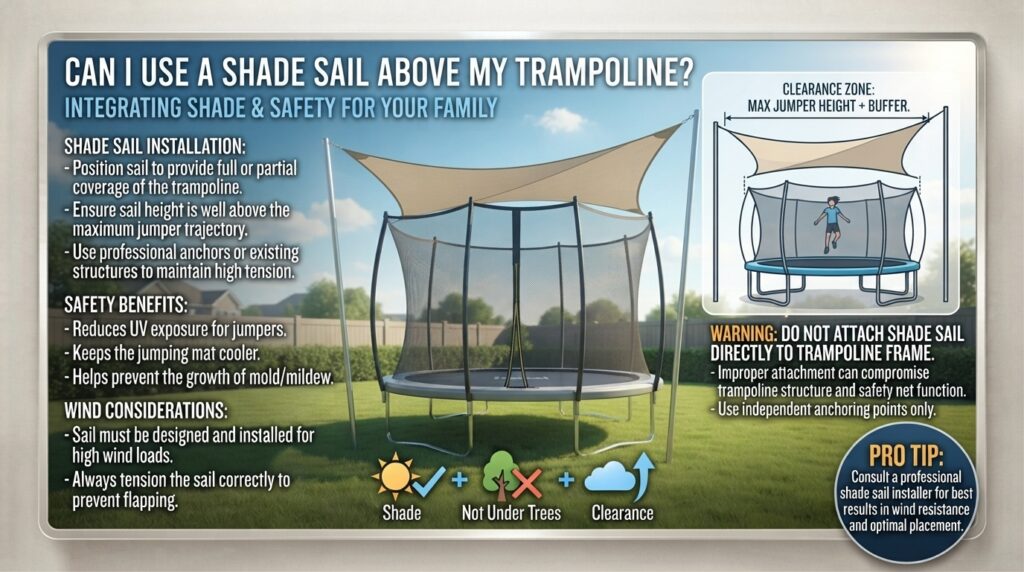
The single most critical factor when installing a shade sail above a trampoline is overhead clearance. You must ensure that even the highest jumper will never make contact with the sail or its mounting hardware.
       +---------------------------------------------+
       |             SHADE SAIL (Angled)             |
       +---------------------------------------------+
                             ^
                             |  MINIMUM 3 - 5 FEET CLEARANCE
                             v
       +---------------------------------------------+
       |          SAFETY ENCLOSURE NET TOP           |
       +---------------------------------------------+
                             ^
                             |  6 - 8 FEET NET HEIGHT
                             v
       +---------------------------------------------+
       |             JUMPING MAT SURFACE             |
       +---------------------------------------------+
                             ^
                             |  3 FEET GROUND CLEARANCE
                             v
       =================== GROUND ===================
Measuring Your Required Height
To calculate the minimum anchor height for your shade sail, use this simple formula:
$$\text{Minimum Sail Height} = \text{Frame Height} + \text{Net Height} + \text{Safety Buffer (3 to 5 ft)}$$
- Standard Frame Height: ~3 feet off the ground
- Standard Safety Net Height: ~6 feet above the mat
- Total Trampoline Assembly Height: ~9 feet
- Required Safety Buffer: 3 to 5 feet above the top of the net poles
- Minimum Shade Sail Attachment Height: 12 to 14 feet from the ground
Crucial Safety Rule: Never anchor a shade sail directly to the trampoline’s enclosure poles. Enclosure poles are designed solely to hold the safety netting and will bend or snap under the extreme lateral tension generated by a shade sail during high winds.
3. Selecting the Right Shade Sail Material and Shape
Not all shade sails are built for outdoor recreational zones. Choosing the correct fabric and shape ensures both longevity and stability.
Fabric Selection: Permeable HDPE vs. Waterproof PVC
- High-Density Polyethylene (HDPE) Mesh (Recommended):
- Pros: Breathable woven fabric lets hot air escape upward and allows rainwater to pass through, preventing heavy water pooling during sudden downpours.
- Best For: High-wind areas like coastal Texas, the San Francisco Bay Area, and Southern California.
- Waterproof Polyester / PVC Coated Fabric:
- Pros: Blocks 100% of rain.
- Cons: Traps wind like a sail, putting massive loads on mounting posts. Water pools in the center if not sloped at a steep angle (minimum 30° tilt).
Selecting the Shape
- Triangle Sails (3-Point): Easier to tension and ideal for tight backyard layouts. Works well over smaller 10–12 ft round trampolines.
- Rectangle / Square Sails (4-Point): Offers maximum coverage for large 14–16 ft round or rectangular trampolines. Requires robust mounting posts at all four corners.
- Hyperbolic Paraboloid (“Hypar”) Layout: Created by mounting two diagonal corners high and two diagonal corners low on a 4-point sail. This 3D twist directs wind over the sail and sheds water effortlessly.
4. Mounting Options: Posts, House Structures, and Hardware
To safely suspend a sail 12 to 14 feet in the air, your mounting anchor points must be rock solid.
Option A: Steel or Timber Ground Posts
When installing freestanding posts in your lawn or yard:
- Steel Posts: Use schedule 40 galvanized steel pipe (minimum 3-inch outer diameter).
- Timber Posts: Use 6×6 pressure-treated wooden posts (avoid 4×4 posts as they flex under tension).
- Embedment Rule: Embed at least one-third (1/3) of the post length underground inside a poured concrete footing. For a 14-foot above-ground attachment point, use an 18-foot post with 4 feet set in concrete.
Option B: Attaching to House Fascia or Wall Studs
- Attach heavy-duty stainless steel pad eyes or diamond eye plates directly into solid structural wood (roof rafters or wall studs).
- Never fasten mounting hardware into gutter systems, fascia boards without rafter backing, or vinyl siding alone.
Essential Stainless Steel Hardware Kit
Always use 316 marine-grade stainless steel hardware to resist rust and fatigue:
- Turnbuckles: Placed at two corners to apply precise tension.
- Snap Hooks / Carabiners: Allow for quick detachment before major storms.
- Pad Eyes: Anchored into wood studs or steel posts.
- Stainless Steel Wire Cable: Used to bridge long gaps between the sail corner and distant anchor points.
5. Regional Considerations for US States
Different climates require specific adjustments to keep your shade sail setup safe and durable:
Texas (Dallas, Houston, Austin)
- Climate Challenge: Severe summer heat waves combined with sudden spring thunderstorms and high wind gusts.
- Solution: Use permeable HDPE mesh to prevent water pooling during torrential downpours. Install quick-release snap hooks so the sail can be taken down when severe thunderstorm or tornado warnings are issued.
California & San Francisco Bay Area
- Climate Challenge: High year-round UV index, coastal fog, and strong afternoon sea breezes (especially in San Francisco).
- Solution: Use commercial-grade 320+ GSM (grams per square meter) fabric for maximum UV block. Ensure ground posts are deeply anchored to withstand persistent daily wind loads.
New York & Northeast
- Climate Challenge: Hot, humid summers followed by heavy winter snowfall.
- Solution: Take the shade sail down entirely during the late autumn and winter months. Snow accumulation on a shade sail will stretch the fabric or collapse the mounting posts.
Washington State & Pacific Northwest
- Climate Challenge: Frequent rainfall and wind storms.
- Solution: Set a steep 25° to 30° slope angle on permeable sails to ensure rain drains freely without sagging the fabric. Use stainless steel hardware to prevent rust in damp climates.
6. Pre-Installation Step-by-Step Guide
1.Measure Space and Sunlight Trajectory:1-2 hours.
Map out where the sun hits your yard during peak jumping hours (11:00 AM to 4:00 PM). Determine anchor points that position the shade shadow directly over the trampoline during those times.
2.Install Mounting Points:3-5 hours (plus 48h concrete cure time).
Set steel or 6×6 timber posts in concrete footings (4 feet deep) or secure 316 stainless steel pad eyes into the structural framing of your home. Allow concrete to cure completely for 48 hours.
3.Attach Hardware and Tension the Sail:30-45 minutes.
Connect corner snap hooks to your anchor points. Use turnbuckles on at least two corners to pull the sail completely taut until there are no visible wrinkles or center sags.
4.Verify Jump Safety Buffer:15 minutes.
Have an adult jump on the trampoline while an observer verifies that the highest bounce maintains at least 3 to 5 feet of clearance below the lowest point of the sail.
7. Frequently Asked Questions (FAQ)
1. Can I attach a shade sail directly to the trampoline enclosure poles?
No, absolutely not. Trampoline enclosure poles are designed only to support the lightweight safety net. The wind load on a shade sail can easily generate hundreds of pounds of tension force, which will bend, buckle, or snap the enclosure poles, creating a severe hazard.
2. How high above the trampoline should the shade sail be installed?
The sail should be mounted at least 3 to 5 feet above the very top of the safety enclosure net poles. Because standard trampoline nets reach around 9 feet high, your sail attachment points should be placed 12 to 14 feet above ground level.
3. Will a shade sail stretch out or sag over time?
High-quality HDPE shade sails will stretch slightly during their first few weeks under tension. This is normal. You can easily remove the slack by tightening the corner turnbuckles. Selecting a sail with curved edges also helps distribute tension evenly across the center.
4. Should I take the shade sail down during winter or heavy storms?
Yes. You should take down your shade sail whenever wind speeds are expected to exceed 40 mph, during winter snowfall, or when tropical storms/Nor’easters approach. Using stainless steel snap hooks makes removal a simple 5-minute task.
5. Does a shade sail trap heat under the trampoline?
If you choose a permeable (breathable) HDPE woven mesh sail, hot air passes right through the fabric, creating a cool breeze under the canopy. Solid waterproof fabrics, however, can trap heat underneath if mounted too low.
6. What shape shade sail works best over a round trampoline?
A triangle (3-point) or hyperbolic square (4-point with staggered heights) sail works best. A hyperbolic square design (where two opposite corners are mounted high and two low) provides great shade coverage while letting wind flow over and under the sail easily.
7. How long does a quality shade sail last?
A commercial-grade HDPE shade sail with UV-stabilized thread typically lasts between 5 and 10 years, even in sun-heavy states like Texas and California.
8. Can I install a shade sail if my yard has limited space or close neighbors?
Yes. If space is tight, you can attach two corners of the sail to your home’s roof line or exterior wall studs (using heavy-duty stainless steel hardware) and anchor the remaining corner to a single embedded post along your fence line.
9. Will a shade sail protect my trampoline mat from leaf debris and bird droppings?
Yes! In addition to blocking UV rays, a shade sail acts as a overhead barrier that catches falling leaves, twigs, pollen, and bird droppings, keeping your trampoline mat clean and reducing overall maintenance.
10. Is a permit required to install shade sail posts in my backyard?
In most residential zones across Texas, California, Washington, and New York, temporary shade structures and light backyard posts under 15 feet do not require a building permit. However, if you are anchoring into property line fences or live in an HOA-governed community (common in Texas and California), check local guidelines before setting posts in concrete.
Conclusion
Using a shade sail above your trampoline is one of the smartest upgrades you can make for your backyard setup. By choosing a breathable HDPE sail, mounting it on dedicated posts or house structures at least 12 to 14 feet high, and maintaining proper tension, you eliminate the safety hazards of falling tree branches while creating a comfortable, UV-protected play zone for your family year-round.