The Ultimate Guide to Trampoline Placement: Safety, Longevity, and Maximum Fun
Investing in a trampoline is one of the most exciting decisions a family can make. It promises endless afternoons of screen-free play, cardiovascular exercise, and the sheer joy of defying gravity. However, before the first spring is attached or the first bounce is taken, there is one critical question that determines both the safety of your children and the lifespan of your investment: Where should a trampoline be placed?
Many homeowners make the mistake of assuming any flat patch of grass will do. In reality, choosing the right “landing zone” involves a complex mix of soil science, overhead clearance, safety margins, and local climate considerations.
In this comprehensive guide, we will break down every variable you need to consider to ensure your trampoline is a safe haven for fun rather than a backyard hazard.
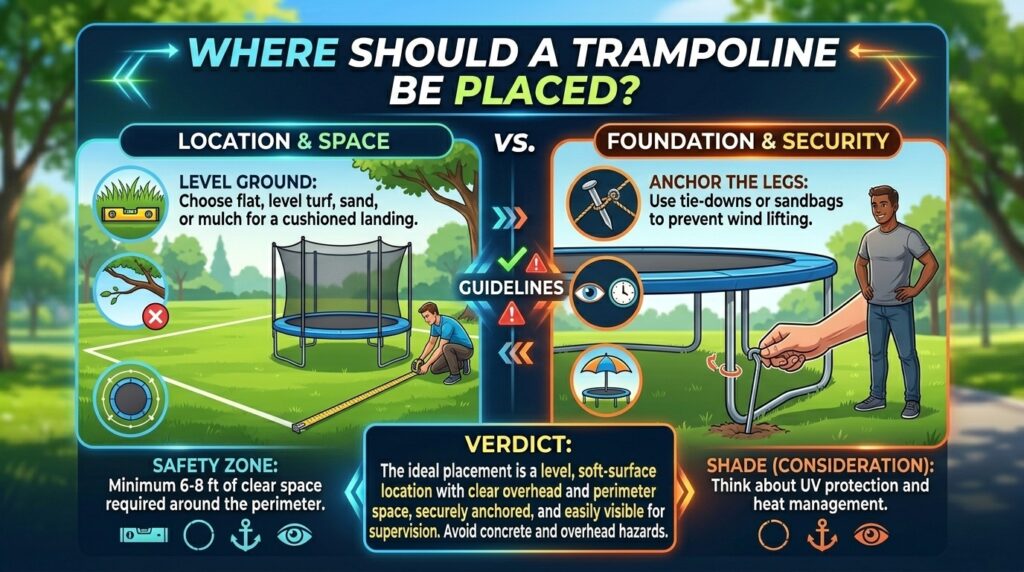
1. The Golden Rule: The 360-Degree Safety Buffer
The most common cause of trampoline-related injuries isn’t actually the bounce itself; it’s what happens when a jumper loses control and exits the mat. Even with a high-quality safety net, physics dictates that you must have a “fall zone.”
The 2-Meter Rule
Safety experts and manufacturers generally recommend a minimum of 2 meters (approximately 6.5 feet) of clear space around the entire perimeter of the trampoline. This area must be completely free of:
- Fences and brick walls.
- Garden sheds or playhouses.
- Concrete paths or pavers.
- Trees, stumps, and rocks.
Why the Buffer Matters
A safety net is a “passive” safety device. It is designed to flex. If you place your trampoline only 1 foot away from a wooden fence, a child falling into the net will likely strike the fence through the netting. This creates a secondary impact that can cause significant injury.
2. Overhead Clearance: Looking Up
It’s easy to focus on the ground, but the space above the trampoline is just as vital. Modern high-tension springs allow older children and adults to reach surprising heights.
The 7-Meter Standard
Ideally, you should have at least 7 meters (23 feet) of vertical clearance from the ground up. Before you anchor your trampoline, look up and check for:
- Tree Branches: Beyond the risk of a jumper hitting a branch, falling leaves and sap can degrade the jumping mat and cause it to become dangerously slippery.
- Power Lines: This is a non-negotiable safety risk. Never place a trampoline under or near utility lines.
- Roof Overhangs: Gutters and eaves are often closer than they look. A gust of wind or an ambitious jump could lead to a painful collision.
3. Ground Leveling and Surface Selection
A trampoline must be level. If it sits on a slope, the jumper will naturally gravitate toward the lowest point of the mat. This puts uneven stress on the springs and frame, increasing the risk of structural failure and causing “double bounces” that lead to collisions between jumpers.
Best Surfaces for Placement
- Grass: The gold standard. It provides natural shock absorption for the frame and is easy on the feet of those waiting their turn.
- Wood Bark or Mulch: Excellent for drainage and impact absorption. Ensure it is deep enough (at least 10–12 inches) to provide cushioning.
- Rubber Chippings: A more permanent, professional-grade solution often used in public playgrounds.
Surfaces to Avoid
- Concrete or Asphalt: These surfaces offer zero “give.” If a jumper falls off, the impact is unforgiving. Furthermore, the constant friction of the metal frame vibrating against concrete will wear down the legs of the trampoline and eventually cause them to snap.
- Artificial Turf: While level, it can get incredibly hot in the sun, and the friction can wear out the turf quickly.
Pro Tip: If your yard is sloped, do not use bricks to “prop up” the legs. Instead, dig a small trench for the legs on the “high side” of the slope to sink the frame until it is level.
4. Soil Composition and Drainage
The ground beneath your trampoline needs to be stable.
Avoiding the Mud Pit
Trampolines naturally shade the grass beneath them, which can lead to moisture retention. If your soil is heavy clay, you might find that after a rainstorm, the area under the trampoline remains a muddy swamp. This can lead to:
- Rust: Constant moisture causes the lower frame and leg joints to corrode.
- Sinking: Heavy use on wet soil can cause the legs to sink unevenly.
If you have poor drainage, consider digging out the area under the trampoline and filling it with gravel or wood chips to allow water to move away from the metal components.
5. Sun, Shade, and Environmental Wear
Where you place the trampoline in relation to the sun affects how much use it gets and how long it lasts.
UV Protection
Even though most modern mats are “UV resistant,” constant exposure to direct, harsh sunlight will eventually break down the polypropylene fibers of the mat and the foam of the safety pads.
- Filtered Shade: Placing the trampoline near (but not directly under) a large tree can provide “dappled shade,” keeping the mat cool and extending the life of the plastics.
- The Heat Factor: On a 90°F day, a black trampoline mat in direct sun can reach temperatures that are uncomfortable for bare feet.
Wind Considerations
If you live in a high-wind area, placement near a windbreak (like a hedge or the leeward side of the house) is wise. However, always use an anchor kit. A trampoline is essentially a giant sail; without anchors, a heavy gust can lift it into your neighbor’s yard or through a window.
6. Visibility and Supervision
From a parenting perspective, placement is about more than just physics—it’s about psychology.
- Line of Sight: Can you see the trampoline from the kitchen window or the back porch? You are far more likely to catch unsafe behavior (like multiple jumpers or “double flipping”) if the trampoline is within your natural field of vision while you are doing chores or relaxing.
- Accessibility: If the trampoline is tucked away in a dark, buggy corner of the yard, children are less likely to use it. Place it in a “high traffic” area of the lawn to ensure it becomes a daily part of their routine.
7. The “In-Ground” Option: A Permanent Alternative
If you are worried about the aesthetics of a large metal structure in your yard, or if you want the ultimate in safety, consider an In-Ground Trampoline.
Pros of In-Ground Placement:
- Zero Fall Height: The mat is flush with the grass.
- Aesthetics: It doesn’t block the view of your garden.
- Stability: It cannot blow away in the wind.
Cons of In-Ground Placement:
- Cost: Requires significant excavation and a retaining wall.
- Drainage: You must install a soak-away or pump to prevent the pit from filling with water.
- Airflow: You need specialized vented pads to allow air to escape from under the mat, otherwise the “bounce” feels stiff.
Summary Checklist for Trampoline Placement
| Feature | Requirement |
| Lateral Clearance | 2 meters of clear space in all directions. |
| Vertical Clearance | 7 meters of space above the mat. |
| Surface Type | Soft grass, bark, or rubber mulch. |
| Levelness | Within 1–3 degrees of horizontal. |
| Visibility | Visible from primary “parental zones” (kitchen/patio). |
| Anchoring | Secured with auger-style ground stakes. |
Final Thoughts
The “perfect spot” for a trampoline is where safety meets convenience. By taking an extra hour to measure your clearances, check your soil, and analyze the path of the sun, you aren’t just placing a piece of play equipment—you are engineering a safer, more durable, and more enjoyable environment for your family.
Remember, once the trampoline is built, it is difficult to move. Measure twice, dig once, and bounce forever.

