How do you fix a puncture on a double pad in the middle of a trip?

Few sounds induce pure dread in the backcountry quite like a faint, rhythmic hiss escaping from beneath your tent.
When you are using individual sleeping mats, a puncture is an annoying setback for one person. But when you switch to a luxury two-person sleeping system, the stakes skyrocket: a single tear means both campers will wake up shivering on the cold, hard ground.
Whether you are deep in the high-elevation backcountry of California’s Sierra Nevada, enduring a damp night in New York’s Adirondacks, or dealing with rough limestone ground in West Texas, knowing how to fix a puncture on a double pad in the middle of a trip is a non-negotiable wilderness skill.
This comprehensive guide covers the physics of field punctures, step-by-step instructions for tracking down silent microscopic leaks, field-tested patch techniques, and region-specific tactics to ensure your emergency repair holds strong for the remainder of your eco-adventure.
1. The Emergency Backcountry Gear: The Repair Kit Essentials
Before stepping onto any trail from the San Francisco Bay Area to the Pacific Crest Trail in Washington, your repair kit must be fully prepped. Do not rely entirely on the stock patches that shipped in the box without confirming what is inside.
A comprehensive, field-ready patch kit contains:
- High-Adhesion TPU Patches: Brands like Gear Aid (Tenacious Tape Flex Patches) or Tear-Aid (Type A) offer specialized, elastic Thermoplastic Polyurethane patches that flex and stretch as the pad is inflated.
- Fast-Curing Liquid Adhesive: Traditional polyurethane adhesives (like Aquaseal FD or Seam Grip WP) create a permanent, chemical bond but can take 8 to 12 hours to cure. For quick field fixes, carry UV-activated adhesives or ultra-fast curing formulas (like Seam Grip +SIL for silicone-treated fabrics or fast-drying contact cements).
- Alcohol Prep Wipes: Industrial-grade isopropyl alcohol pads are mandatory for removing trail dust, skin oils, and condensation from the pad’s face fabric. Without this step, your patch will peel off under pressure.
- A Precision Marker or Chalk: To mark the exact center of microscopic leaks before they dry and vanish.
2. Step-by-Step: The Backcountry Protocol for Locating Leaks
The hardest part of fixing a sleeping pad puncture isn’t applying the patch; it is finding the microscopic hole. On a massive double pad with twice the surface area of a standard mat, tracking down a leak requires a methodical approach.
The Order of Operations
1.Check the Valves First:Time: 2 Mins.
Over 40% of sudden air leaks do not occur in the fabric; they happen because a valve is partially clogged with grit, hair, or pine needles. Inflate the pad fully, close the valves, dump a tiny bit of water directly into the valve housing, and watch closely for escaping bubbles.
2.The High-Pressure Squeeze Test:Time: 5 Mins.
If the valves are sealed tight, inflate the double pad to its absolute maximum capacity. Have your camping partner sit fully on one end of the pad to double the internal air pressure. Slowly move your ear an inch above the surface, scanning the baffles systematically from top to bottom to listen for a distinct hiss.
3.The Soap and Water Wipe-Down:Time: 10 Mins.
Mix a few drops of biodegradable camp soap (like CampSuds or Dr. Bronner’s) with water in a camp mug or a water bottle. Dip a pack towel or bandana into the soapy mixture and wipe it smoothly over the inflated pad. Watch for the sudden formation of small, rapidly growing foam bubbles.
4.Mark the Spot:Time: 30 Seconds.
The second you spot the escaping bubbles, dry the immediate area slightly with a towel and use a pen or marker to draw a clear circle around the hole. If you skip this, the hole will become completely invisible the moment the soapy water dries.
3. The Field Patch Procedure: Achieving a Permanent Seal
Once you have identified the location of the puncture, you must execute the repair carefully. Follow this clinical workflow to ensure your patch handles the combined weight of two adults.
Step 1: Prep the Surface
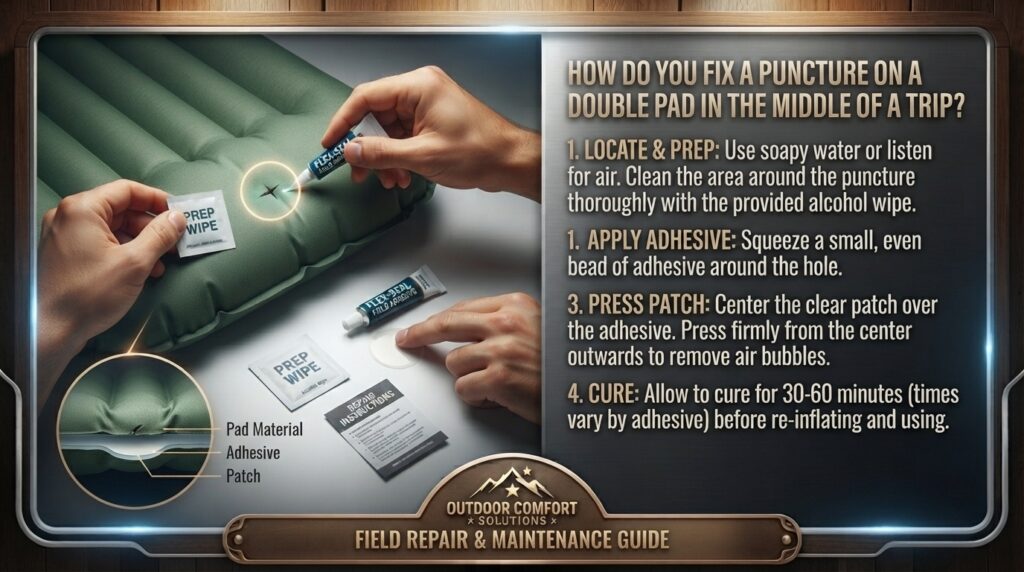
Deflate the double sleeping pad completely. If the pad remains pressurized, escaping air will blow out right through the wet adhesive, ruining the bond. Clean the circled area thoroughly with an alcohol prep wipe, expanding the cleaning zone roughly two inches beyond the hole in all directions. Allow the alcohol to air-dry completely (about 60 seconds).
Step 2: Shape the Patch
If you are using roll-form repair tape (like Tenacious Tape), cut a circular or oval patch.
The Golden Rule of Patch Shape: Never leave sharp, 90-degree corners on a repair patch. Sharp corners easily catch on your sleeping bag fabric as you shift at night, causing the patch to lift and fail. Always round out the edges with your camp scissors or knife.
Step 3: Apply the Bond
- For Instant TPU Patches: Peel back the protective paper backing, center the patch directly over the puncture, and press it down firmly from the middle outward to push out any trapped air bubbles. Use the smooth edge of your thumb or a lighter casing to burnish the patch firmly into the fabric.
- For Hybrid Liquid/Patch Repairs: If the tear is jagged or sits directly on a deep structural baffle seam, apply a thin layer of liquid polyurethane adhesive directly over the hole. Let it sit until tacky, then apply your TPU patch over the top, extending the edges past the liquid glue layer.
Step 4: Cure and Test
If you used a standard peel-and-stick patch, you can technically reinflate the pad within 30 minutes. If you used liquid adhesive, give the bond as much time to cure as possible—ideally 4 to 6 hours. Before sleeping, inflate the pad to medium pressure and lie down with your partner to confirm the patch holds under full load.
4. Regional Adaptations: Repairing Across Diverse Climates
Because myecoadventure.com caters to backpackers exploring vastly different environments across the United States, your repair strategy must adapt to local temperatures and weather conditions.
Texas: Heat Management and Fast Glue Expirations
Backpacking through the desert heat of Big Bend or the dusty paths of Palo Duro Canyon alters chemical performance.
- The Climate Challenge: Intense daytime heat can cause liquid adhesives to dry up inside the tube instantly once opened. Furthermore, high ambient temperatures accelerate radiant expansion inside your pad.
- The Repair Strategy: Always perform repairs in the shade or during the cool evening hours. When a patch cures in extreme heat, the adhesive can thin out and fail to bond correctly to the nylon base.
- Pro-Tip: Once patched, do not leave your double pad fully inflated inside a roasting tent during a Texas afternoon; the expanding air will tear the fresh patch right off the hole.
New York: Managing Damp Environments and Slow Cure Times
Backpacking the damp, high-humidity terrain of the Adirondacks or the Catskills impacts moisture-sensitive gear.
- The Climate Challenge: Constant moisture and damp air slow down the evaporation of alcohol prep wipes and drastically extend the cure times of liquid glues.
- The Repair Strategy: Before applying a patch, you must thoroughly dry the fabric. Use a camp stove or body heat to gently warm and dry the repair zone. Avoid applying liquid glues in high humidity if you have access to a dry, instant peel-and-stick patch.
- Pro-Tip: If you must use liquid adhesive in the wet Northeast, wrap a water bottle in a warm wool sock and rest it gently over the curing patch to keep the area warm and dry.
California: Alpine Cold and Elastic Stress at High Altitudes
Backpacking along high Sierra routes like the John Muir Trail means dealing with low temperatures and high elevations.
- The Climate Challenge: Freezing alpine nights cause standard repair tapes to become brittle and lose their stickiness.
- The Repair Strategy: Keep your repair patch warm inside your inner jacket pocket before applying it. Warmth keeps the adhesive backing pliable and sticky.
- Pro-Tip: Because air pressure fluctuates sharply as altitude drops or rises, check the patch tension before you climb into your tent for the night.
Washington State: The Pacific Northwest Moisture Challenge
Backpacking in the Pacific Northwest—whether the Hoh Rainforest or the North Cascades—presents constant rain and damp trail conditions.
- The Climate Challenge: Finding a dry spot to fix gear when it is raining outside.
- The Repair Strategy: Never perform a pad repair outside in the rain. Bring the deflated pad completely inside your dry tent body. Use a clean pack towel to dry the wet tent floor before laying the pad down to work on it.
- Pro-Tip: Carry a small strip of specialized silicone-compatible tape if your tent or pad uses a high-end silicone coating, as standard glues will slide right off silnylon surfaces.
San Francisco Bay Area: Coastal Fog and Salt Crust
Backpacking through the foggy environments of Point Reyes or the marine layers of the Santa Cruz Mountains brings unique challenges.
- The Climate Challenge: Pervasive, damp marine fog carrying airborne salt particles.
- The Repair Strategy: The salt crust deposited by coastal fog prevents adhesives from grabbing the underlying nylon thread. You must wipe the fabric clean with fresh water before using your alcohol prep wipe.
- Pro-Tip: Perform your repair inside the tent during the late afternoon before the thick evening fog rolls in and dampens the nylon shell.
5. Technical Comparison: Field Repair Strategies
When choosing how to address a leak on the trail, evaluate the trade-offs of the three primary backcountry patching methods:
| Repair Method | Best For | Cure Time | Durability | Cons |
| Peel-and-Stick TPU Tape | Flat surfaces, smooth punctures, quick fixes | 10-30 Mins | High (Good for 3-season use) | Can peel on complex baffle seams |
| Liquid Polyurethane Glue | Baffle seams, odd corners, valve joints | 8-12 Hours | Permanent / Factory Grade | Requires long curing time; messy |
| UV-Activated Adhesive | Fast field fixes on technical fabrics | 30 Seconds (Under direct sunlight/UV light) | Moderate to High | Requires active UV light exposure to cure |
6. Frequently Asked Questions (FAQ)
1. Can I use standard duct tape to fix a sleeping pad puncture?
Duct tape should only be used as a desperate last resort. Standard duct tape utilizes a water-based adhesive that breaks down rapidly under body heat and high pressure. Within a few hours of lying on it, the air pressure will force a channel through the tape, causing it to leak again. Additionally, duct tape leaves behind a sticky residue that makes it very difficult to apply a permanent patch later.
2. What do I do if the leak is right on a seam or dimpled baffle?
Seam leaks are the most challenging field repairs because flat tape cannot conform to the sharp drops of a welded joint. To fix a seam leak: use a liquid polyurethane adhesive (like Seam Grip WP). Deflate the pad entirely, apply a thick bead of liquid glue directly into the seam channel, extend it half an inch past the hole, and let it cure flat for at least 8 hours.
3. How can I find a leak if I don’t have access to camp soap or water?
If you have zero water available, inflate the pad to maximum pressure inside a completely quiet tent. Close your eyes and run your highly sensitive upper lip or eyeball an inch above the fabric surface. Your skin will easily feel the cool stream of escaping air long before your ears can hear it.
4. Is a field patch permanent, or do I need to replace the double pad?
A high-quality field repair using a TPU patch and polyurethane adhesive is often permanent and can easily last for the remaining lifespan of the pad. If the patch holds air for 48 consecutive hours without losing pressure, there is no need to replace the mat.
5. Why did my patch blow out immediately when I refilled the pad?
This almost always happens for two reasons: you either left air pressurized inside the pad while the glue was setting, or you failed to properly clean the body oils and trail dust off the fabric using an alcohol wipe before applying the patch.
6. Can I use a bike tire tube patch kit on my double backpacking pad?
Generally, no. Bike tire patch kits are engineered for thick, vulcanized rubber and use a chemical vulcanizing fluid designed specifically for rubber tubes. Modern backpacking pads use advanced TPU-laminated nylon or polyester fabrics, which will not bond correctly with bicycle patch fluid.
7. What should I do if the valve housing itself is leaking?
If air is leaking from the junction where the plastic valve housing meets the fabric body, tape will not work. You must deflate the pad, clean the joint, and apply a thick, continuous ring of liquid polyurethane adhesive all the way around the valve base, allowing it to cure completely flat.
8. How big of a tear can a backcountry repair kit handle?
A standard TPU patch can easily seal punctures and tears up to 2 inches long. For long gashes caused by sharp knives or animal claws, you will need to stitch the fabric edges together using nylon thread first, coat the stitching completely with liquid adhesive, and then place a wide patch over both sides of the repair.
9. Will a field patch alter my pad’s R-value or insulation?
No. A localized field patch covers a tiny fraction of the pad’s total surface area and has no measurable impact on its thermal performance or ASTM R-value insulation rating.
10. How do I remove a failed field patch once I get back home?
If you need to replace a sloppy trail repair with a clean factory patch at home, use a small amount of isopropyl alcohol or a specialized adhesive remover (like Goo Gone) to gently soften the tape’s adhesive. Carefully peel it back, scrape away the residue, and clean the area thoroughly before applying a new permanent patch.
Conclusion: Turning a Potential Disaster Into a Quick Fix
A punctured double sleeping pad can instantly test the harmony of any camping duo. However, a leak doesn’t have to mean the end of your backpacking trip.
By carrying a dedicated, high-quality repair kit, methodically tracking down the leak using sound and soap, and properly preparing the fabric surface before applying a rounded TPU patch, you can completely restore your sleep system right on the trail.
From the windy, exposed ridges of Washington to the humid campgrounds of New York, mastering this basic maintenance skill gives you the self-reliance needed to keep exploring comfortably. Pack the right tools, check your valves before every adventure, and enjoy the peace of mind that comes with knowing you can handle whatever the trail throws your way.