
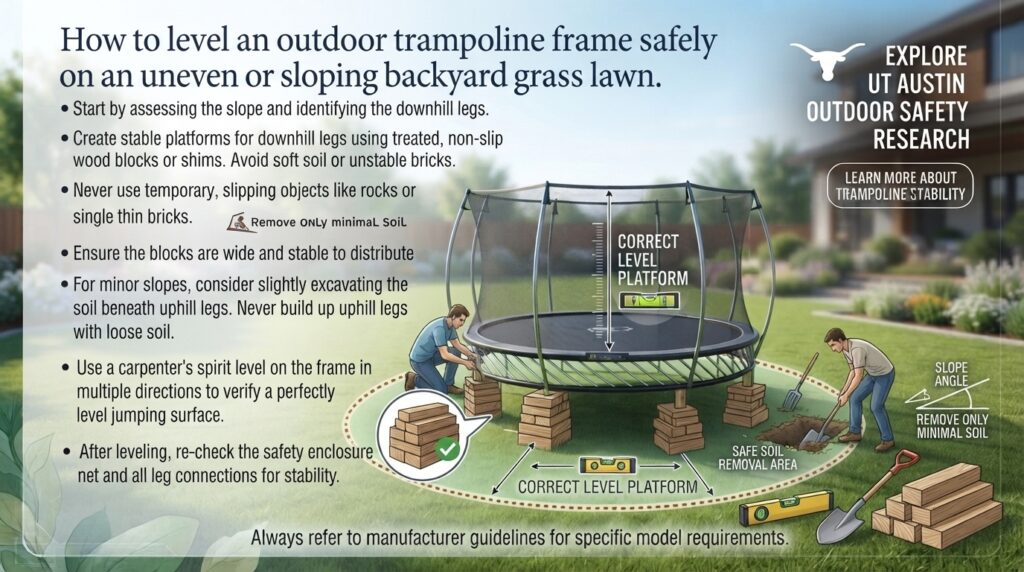
How to level an outdoor trampoline frame safely on an uneven or sloping backyard grass lawn? Installing an outdoor family trampoline is one of the most effective ways to encourage active outdoor play and family fitness. However, few suburban or urban backyards feature a perfectly flat lawn. Whether you are dealing with the rolling terrain of a property in Texas, terraced residential lots in California, micro-yard gradients in San Francisco, urban gardens in New York, or sloped coastal yards across Washington, setting up a trampoline on uneven or sloping grass is a very common challenge.
Assembling a trampoline on an unlevel surface creates significant structural strain on the steel frame, causes uneven spring tension, and continuously forces jumpers toward the downhill enclosure net—greatly increasing the risk of frame tipping, net failure, and joint injuries.
This guide details how to measure ground slope, evaluate safe leveling techniques, execute excavation procedures, anchor the frame, and maintain long-term stability on sloping lawns.
1. The Physics and Hazards of an Unlevel Trampoline
Understanding how gravity and kinetic energy interact with an inclined trampoline frame highlights why levelling is necessary before use.
       [ JUMPER DOWNWARD FORCE ]
                   │
                   ▼
       ┌──────────────────────┐
       │   UNLEVEL FRAME      │
       └──────────┬───────────┘
                  │
     ┌────────────┴────────────┐
     ▼                         ▼
┌───────────────────────┐ ┌───────────────────────┐
│ DOWNHILL LEG OVERLOAD │ │ UPHILL LEG LIFT OFF   │
├───────────────────────┤ ├───────────────────────┤
│ • Spring stretch      │ │ • Frame walking       │
│ • Net impact risk     │ │ • Structural tipping  │
│ • Joint shear stress  │ │ • T-socket twisting   │
└───────────────────────┘ └───────────────────────┘
When a trampoline sits on a slope, gravity pulls the jumper downhill during every bounce apex.
- Uneven Weight Distribution: The downhill U-shaped legs absorb significantly higher dynamic force than the uphill legs. Over time, this concentrated load stretches downhill springs, warps T-sockets, and bends galvanized leg tubes.
- Tipping and “Frame Walking”: Bouncing on an incline shifts the center of gravity outward. Downhill kinetic energy causes the frame to “walk” or creep down the slope, while uphill legs can lift off the grass entirely.
- Enclosure Net Stress: The downhill safety net absorbs repeated, high-velocity lateral impacts. Because enclosure nets are designed for secondary containment rather than continuous stopping power, this leads to premature net tears and pole snapping.
2. Measuring Your Lawn Slope: Safe vs. Unsafe Incline Limits
Before choosing a levelling method, you must measure the exact degree or percentage of your lawn’s slope.
  ┌─────────────────────────────────────────────────────────────┐
  │                   LAWN SLOPE MEASUREMENT                    │
  └──────────────────────────────┬──────────────────────────────┘
                                 │
         ┌───────────────────────┴───────────────────────┐
         ▼                                               ▼
  [ 0° TO 3° SLOPE ]                           [ > 3° SLOPE ]
  (1–3 inches of drop)                         (4+ inches of drop)
         │                                               │
         ▼                                               ▼
  • Minor incline                               • Significant slope
  • Level with shallow trenching               • Requires deep leg trenching
    or levelling blocks                          or retaining wall terraces
The 3-Degree Rule
- 0 to 3 Degrees (Minor Incline): Safe to level using basic leg trenching or level-block shimming. This equates to a drop of roughly 1 to 3 inches across a 12-foot span.
- 3 to 7 Degrees (Moderate Slope): Requires digging individual leg channels down to the lowest level point, ensuring full structural support.
- Greater than 7 Degrees (Steep Incline): Unsafe for standard leg adjustments. Requires professional grading, earth retaining walls, or terracing before assembly.
How to Measure Slope Step-by-Step
| Step | Action | Tools Needed |
| 1. Span the Area | Lay a long, straight 2×4 wooden board across the exact spot where the downhill and uphill legs will rest. | 12–16 ft 2×4 Board |
| 2. Set the Level | Place a standard carpenter’s spirit level on top of the board. Lift the downhill end of the board until the bubble centers. | Spirit Level |
| 3. Measure the Gap | Measure the vertical distance (in inches) between the lifted downhill end of the board and the grass surface. | Tape Measure |
| 4. Calculate Slope % | Divide the vertical drop by the board length (in inches) and multiply by 100. (Example: A 6-inch drop over a 144-inch board = 4.1% slope). | Calculator |
3. Comparison of Trampoline Levelling Methods
Choosing the correct levelling method depends on your slope gradient, budget, and lawn conditions.
| Levelling Method | Slope Range | Longevity | Lawn Impact | Safety Rating | Best Used For |
| Digging Trenches (Trenching) | 1° to 7° | High (Permanent) | Low–Medium | Ideal (Safest) | Most suburban lawns with mild to moderate slopes. |
| Level-Block Extensions | 1° to 3° | Medium | Minimal | Acceptable | Small adjustments under 3 inches on firm turf. |
| Commercial Leveling Kits | 1° to 4° | High | Minimal | Good | Custom manufacturer-approved adjustable legs. |
| Wood / Brick Stacking | Any | Low | High | UNSAFE | Never recommended; high risk of slipping/tipping. |
| Earth Terracing / Grading | 7°+ | Permanent | High | Excellent | Steep hillsides requiring retaining wall support. |
4. Method 1: The Trenching Method (Safest DIY Solution)
Digging down the uphill legs into the slope is the most structurally sound method to level a trampoline. By lowering the higher legs into the ground, the entire frame rests on undisturbed, stable earth at the same elevation as the lower legs.
┌─────────────────────────────────────────────────────────────┐
│                   TRENCHING THE UPHILL LEGS                 │
├─────────────────────────────────────────────────────────────┤
│                                                             │
│       UPHILL SIDE                             DOWNHILL SIDE │
│           │                                         │       │
│           ▼                                         ▼       │
│      ┌─────────┐                               ┌─────────┐  │
│      │ TRENCH  │ ◄── Dig high legs DOWN        │ SURFACE │  │
│      │ ┌─────┐ │     to match low side         │ ┌─────┐ │  │
│      │ │ LEG │ │                               │ │ LEG │ │  │
│      └─┴─────┴─┘                               └─┴─────┴─┘  │
│   ═════════════════════════════════════════════════════════ │
│   [STABLE EARTH]                             [STABLE EARTH] │
│                                                             │
└─────────────────────────────────────────────────────────────┘
Critical Safety Rule: Never build up the downhill legs with loose dirt, bricks, or scrap wood to match the uphill legs. Elevated loose material shifts under load. Always dig the uphill side down into stable earth.
Step-by-Step Trenching Guide
1.Assemble and Position the Frame Base:20 Minutes.
Assemble the circular or rectangular bottom steel leg ring on the lawn without attaching the jumping mat, springs, or net. Rotate the frame until the U-shaped legs align naturally with the direction of the slope.
2.Identify the Lowest Base Point:15 Minutes.
Locate the leg resting on the lowest part of the slope. This “downhill leg” serves as your zero-elevation baseline. All other legs will be lowered to match this point.
3.Mark Out Leg Trench Footprints:30 Minutes.
Place a spirit level across the frame from the downhill leg to the uphill legs. Mark the grass around the uphill legs using lawn-safe marking paint, outlining a channel 2 inches wider than each U-leg base.
4.Excavate the Uphill Trenches:45–60 Minutes.
Move the frame aside. Using a square spade, dig out grass and soil within the marked areas. Dig down to the measured drop depth, keeping the bottom of each trench flat and level.
5.Pack Base Gravel and Seat the Frame:30 Minutes.
Line the bottom of each trench with a 1-inch layer of crushed pea gravel or paver sand to facilitate water drainage and prevent soil erosion. Move the frame legs into the trenches and verify levelness across all 360 degrees with a spirit level.
5. Method 2: Level-Block & Shoe Plate Extensions
For very mild slopes (under 3 inches of total drop), high-density rubber pavers or custom leg shoes can be used under the downhill legs without digging deep trenches.
      [ DOWNHILL LEG ASSEMBLY ]
                  │
                  ▼
         ┌─────────────────┐
         │ Steel Frame Leg │
         └────────┬────────┘
                  │
                  ▼
     ┌────────────────────────┐
     │ Heavy-Duty Rubber Tile │  (Min. 1.5–2 inches thick)
     └────────────┬───────────┘
                  │
                  ▼
     ┌────────────────────────┐
     │ Flat Concrete Paver    │  (Provides wide, stable base)
     └────────────┬───────────┘
                  │
                  ▼
   ════════════════════════════ focus: FIRM TURF / GROUND
Safety Requirements for Blocks
- Use Wide Concrete Pavers or Rubber Tiles: Pavers must measure at least 12×12 inches to prevent sinking into wet soil.
- Avoid Smooth Plastics or Wood: Plywood, 2×4 scraps, and plastic bricks split under impact load and slip when wet.
- Embed the Base Paver: Dig out the top layer of sod under the downhill leg and sink the paver flush with the soil line so it cannot slide laterally.
6. Regional Lawn & Soil Considerations Across US States
Lawn conditions, soil density, and climate patterns vary significantly by region and impact trampoline stability:
┌─────────────────────────────────────────────────────────────┐
│                 REGIONAL SOIL & CLIMATE FACTORS             │
├─────────────────────────────────────────────────────────────┤
│                                                             │
│  TEXAS & SOUTHWEST (Clay Soil & High Winds)                 │
│  • Expanding/shrinking Blackland clay                       │
│  • Solution: Heavy pea-gravel trench base + deep augers     │
│                                                             │
│  CALIFORNIA & SAN FRANCISCO (Coastal Hills & Slopes)        │
│  • Terraced hill yards & sandy loam                         │
│  • Solution: Trench into sub-base + rubber paver footings   │
│                                                             │
│  PACIFIC NORTHWEST - WASHINGTON (Saturated Soil)            │
│  • Continuous rain leading to leg sinking                   │
│  • Solution: Deep gravel drainage beds in trenches          │
│                                                             │
│  NEW YORK & NORTHEAST (Freeze-Thaw Cycles)                  │
│  • Frost heavies soil, shifting frame alignment             │
│  • Solution: Re-check levelness every spring post-thaw      │
│                                                             │
└─────────────────────────────────────────────────────────────┘
Texas & Southwest Suburbs
- Soil Challenge: Texas Blackland clay expands when wet and contracts into deep fissures when dry. Trenches dug into clay can shift during seasonal dry spells.
- Stabilization: Fill trench bottoms with 2 inches of compacted crushed limestone or pea gravel to maintain a stable base regardless of soil moisture.
California & San Francisco Bay Area
- Terrace Challenge: High-density hillside properties feature short, steep yard tiers.
- Stabilization: Maintain at least 5 feet of distance between the downhill trampoline legs and the edge of any retaining wall or terraced drop-off to prevent soil shear.
Pacific Northwest (Washington, Oregon)
- Moisture Challenge: Saturated soil soft lawns cause uphill trenched legs to turn muddy, while downhill legs sink deeper into the sod over time.
- Stabilization: Use non-porous rubber equipment pads beneath trenched legs and ensure trench channels have clear drainage paths to prevent standing water.
New York & Northeast Urban/Suburban Lots
- Freeze-Thaw Challenge: Winter frost heaving expands moisture in the soil, lifting trenched legs out of alignment by spring.
- Stabilization: Perform a seasonal level check every spring using a 4-foot carpenter’s level, resetting any gravel beds shifted by winter frosts.
7. Anchoring a Levelled Trampoline on Sloping Ground
Once your trampoline frame is level, anchoring it against wind uplift and lateral creep is crucial—especially on sloped ground.
┌─────────────────────────────────────────────────────────────┐
│               SLOPED LAWN ANCHORING SYSTEM                  │
├─────────────────────────────────────────────────────────────┤
│                                                             │
│            ┌───────────────────────────────┐                │
│            │   LEVELLED TRAMPOLINE FRAME   │                │
│            └───────────────┬───────────────┘                │
│                            │                                │
│                ┌───────────┴───────────┐                    │
│                ▼                       ▼                    │
│      [ HIGH-STRAIN STRAP ]   [ HIGH-STRAIN STRAP ]          │
│                │                       │                    │
│                ▼                       ▼                    │
│       ( 15–18" AUGER )        ( 15–18" AUGER )              │
│       Spiral Earth Anchor     Spiral Earth Anchor           │
│       Driven vertically       Driven vertically             │
│       into solid sub-soil     into solid sub-soil           │
│                                                             │
└─────────────────────────────────────────────────────────────┘
Spiral Earth Augers vs. Straight Stakes
- Spiral Steel Augers: Steel spiral anchors (15 to 18 inches long) screw directly into the subsoil, offering up to 300+ lbs of holding power per leg. Straight smooth tent pegs pull out easily under dynamic loads.
- Strapping Technique: Loop heavy-duty nylon webbing straps around the top circular frame rail—not just the bottom leg tubes—and tension them down to the auger steel rings.
8. Essential Safety Tips & Maintenance
- Inspect Trenches Monthly: Check trenched leg bases for water pooling, mud buildup, or soil collapse after heavy rain.
- Re-Verify Levelness Seasonally: Ground settles over time. Check all horizontal frame rails with a spirit level twice a year.
- Keep Clear Perimeter Clearance: Maintain at least 6 feet of lateral clear space around the entire frame perimeter, free of trees, fences, and landscaping.
- Never Exceed Maximum Single-Jumper Weight Limits: Sloping setups place higher localized force on downhill springs. Keep jumpers within manufacturer guidelines.
- Check T-Sockets for Fatigue: Inspect the weld joints where U-legs meet the circular top ring every 3 months for stress fractures.
9. Frequently Asked Questions (FAQ)
1. Can I put a trampoline on a sloped lawn without levelling it first?
No. Setting up a trampoline on a slope greater than 3 degrees causes jumpers to drift downhill during bounces, straining downhill springs, weakening enclosure net poles, and increasing the risk of frame tipping.
2. How deep can I dig trampoline legs into the ground to level it?
You can dig legs down as deep as needed (typically 3 to 8 inches) to level the frame, provided the bouncing mat still maintains at least 3 feet of clearance above the ground at maximum downward flex.
3. Is it safe to use wooden blocks under downhill legs to level a trampoline?
No. Loose wooden blocks, 2×4 scraps, and bricks can crack, warp, or slide out from under the steel legs when subjected to dynamic bouncing forces. Always dig the uphill side down instead of stacking loose materials underneath the downhill side.
4. What is the maximum safe slope percentage for a backyard trampoline?
Standard residential trampolines can be safely installed on slopes up to 7 degrees (roughly a 12% grade) using trenching methods. Slopes steeper than 7 degrees require professional landscape terracing or excavating a flat pad.
5. How do I prevent water from collecting in the trenches dug for the legs?
Line the bottom of every trench with 1 to 2 inches of pea gravel or crushed stone to allow rainwater to drain away from the steel frame, preventing soil erosion and frame rust.
6. Will trenching trampoline legs ruin my grass?
Trenching removes small sections of sod directly under the U-legs. However, because the cut areas are covered by the steel frame and gravel, it has minimal impact on the surrounding lawn.
7. Can I use adjustable commercial trampoline levelling legs?
Yes. Several manufacturers offer heavy-duty adjustable leg extensions designed specifically for their frames. Ensure the extension kit is explicitly rated for your trampoline model and brand.
8. How do I anchor a trampoline on a sloped lawn?
Use 15-to-18-inch spiral steel earth augers screwed deep into the ground next to each U-leg. Secure the main top frame rail to the auger rings using heavy-duty weather-resistant nylon ratchet straps.
9. Why does my trampoline keep moving downhill even after levelling?
Dynamic bounce energy naturally causes unanchored frames to shift on grass. If your frame “walks,” secure all leg contact points with spiral ground augers or sink the leg bases slightly into shallow gravel-lined beds.
10. How often should I check if my trenched trampoline is still level?
Perform a level check every 3 months, as well as immediately following heavy rainstorms or winter freeze-thaw cycles that cause ground settling.
Conclusion
Leveling a backyard trampoline on an uneven or sloping lawn is essential for structural stability, equipment longevity, and jumper safety.
By taking the time to measure your lawn’s slope, trench the uphill legs into stable subsoil, add drainage gravel, and secure the structure with spiral earth augers, you can create a safe jumping space on almost any backyard gradient.